Computers

Getting Started

  • 1.1.Setting up Your DEBIX
    • 1.1.1. Connecting a Display
    • 1.1.2 Power Supply for DEBIX
    • 1.1.3. Micro SD Card for DEBIX
    • 1.1.4. Optional Items
    • 1.1.5.Troubleshooting
  • 1.2.Installing the Operating System
    • 1.2.1. Downloading an Image
    • 1.2.2. Boot Mode
    • 1.2.3. Installing Images on Linux
    • 1.2.4. Advanced & Optional: Preparing other Linux (not Ubuntu) on Micro SD card
    • 1.2.5. Installing Images on Mac OS
    • 1.2.6. Installing Images on Windows
    • 1.2.7. Make an Image
  • 1.1.2. Power Supply for DEBIX
  • 1.3.View Version

DEBIX OS Related

  • 2.1.Introduction
  • 2.2.Updating DEBIX OS
    • 2.2.1.Using APT
  • 2.3.Playing Audio and Video
  • 2.4.Using a USB webcam
    • 2.4.1.fswebcam Basic Usage
    • 2.4.2.Using Cheese
    • 2.4.3.Using mplayer
    • 2.4.4.Using python3-opencv
  • 2.5.Python
    • 2.5.1.Basic Python usage
    • 2.5.2.Using Command Line
    • 2.5.3.Other Ways of Using Python
    • 2.5.4.Installing Python Libraries
  • 2.6.GPIO and the 40-pin Header
    • 2.6.1.Voltages
    • 2.6.2.Outputs
    • 2.6.3.Inputs
    • 2.6.4.More
    • 2.6.5.GPIO debix-gpio

System Configuration

  • 3.1.Configuring Networking
    • 3.1.1.Via the desktop
    • 3.1.2.Via the Command Line
  • 3.2.Setting up a Routed Wireless Access Point
  • 3.3.Configure HDMI
  • 3.4.Rotating the Display
  • 3.5.Configure external storage
    • 3.5.1.Mounting a Storage Device
    • 3.5.2.Configuring Automatic Mounting
    • 3.5.3.Unmounting a Storage Device
  • 3.6.Localizing your DEBIX
    • 3.6.1.Changing the Language
    • 3.6.2.Configuring the Keyboard
    • 3.6.3.Changing the Timezone
  • 3.7.Securing your DEBIX
    • 3.7.1.Change the Default Password
    • 3.7.2.Improving SSH Security
    • 3.7.3.Installing Firewall ufw
    • 3.7.4.Installing fail2ban
  • 3.8.Configuring Screen Blanking
    • 3.8.1 On Console
    • 3.8.2. Configuring Screen Blanking On the Desktop
  • 3.9. The boot Folder
    • 3.9.1. Boot Folder Contents

Linux Kernel Introduction

  • 4.1.Kernel
    • 4.1.1. Updating your kernel
    • 4.1.2.Putting your code into the kernel
  • 4.2.Building the Kernel
    • 4.2.1.Building the Kernel Locally
    • 4.2.2.Cross-Compiling the Kernel
  • 4.3.Configuring the Kernel
    • 4.3.1.Preparing to Configure
    • 4.3.2.Using menuconfig
    • 4.3.3.Saving your Changes

Using Linux

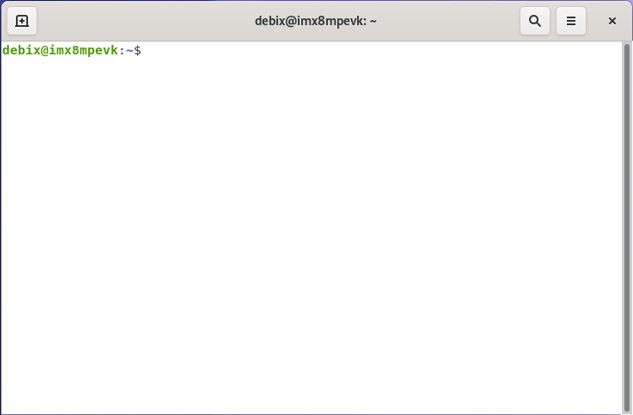
  • 5.1. Terminal Introduction
    • 5.1.1. Terminal Window
    • 5.1.2. Start Enjoying Your DEBIX
    • 5.1.3. About sudo
    • 5.1.4. Auto-complete and history
    • 5.1.5. Using apt to manage packages
    • 5.1.6. Command manual
    • 5.1.7. Other Commonly-used Commands
  • 5.2. The Linux File System
    • 5.2.1. Home
  • 5.3. Linux Commands
    • 5.3.1 Filesystem
    • 5.3.2. Search
    • 5.3.3. Networking
  • 5.4.Text Editors
    • 5.4.1. Text Editors in the Terminal
  • 5.5. Users
    • 5.5.1. Changing Password
    • 5.5.2. Adding User
    • 5.5.3. Deleting a User
  • 5.6. Root and sudo
    • 5.6.1. Sudo
    • 5.6.2. The sudo’ers List
  • 5.7. The .bashrc File
    • 5.7.1. The .bash_aliases File
  • 5.8. Shell Scripts
  • 5.9. Scheduling Tasks with cron
    • 5.9.1. Editing the crontab File
    • 5.9.2. Viewing Scheduled Tasks
    • 5.9.3. Adding Scheduled Task
    • 5.9.4. Erase Scheduled Tasks
    • 5.9.5. Running a Task on Reboot
  • 5.10. The systemd Daemon
    • 5.10.1. Creating a Service

Remote Access

  • 6.1.Introduction to Remote Access
    • 6.1.1.Finding DEBIX's IP address
  • 6.2.Setting up an SSH Server
    • 6.2.1.Set up your Local Network
    • 6.2.2.Enabling the Server
  • 6.3.Secure Shell from Linux or Mac OS
  • 6.4.Secure Shell from Windows 10
  • 6.5.Passwordless SSH Access
    • 6.5.1.Checking for Existing SSH Keys
    • 6.5.2.Generate new SSH Keys
    • 6.5.3.Copy your Key to your DEBIX
  • 6.6.Using Secure Copy
    • 6.6.1.Copying Files to your DEBIX
    • 6.6.2.Copying Files from your DEBIX
    • 6.6.3.Copying Multiple Files
    • 6.6.4.Copying a Whole Directory
  • 6.7.Using rsync
  • 6.8.Network File System (NFS)
    • 6.8.1.Setting up a Basic NFS Server
    • 6.8.2.Configuring an NFS Client
  • 6.9.Samba (SMB/CIFS)
    • 6.9.1.Installing Samba related packages
    • 6.9.2.Mount a Folder Shared from Windows
    • 6.9.3.Sharing a Folder from your DEBIX to Windows 10
  • 6.10.Setting up an Apache Web Server
    • 6.10.1.Installing Apache
    • 6.10.2.Test the Web Server
    • 6.10.3.Installing PHP for Apache
  • 6.11.Network boot your DEBIX

DEBIX Hardware

  • 7.1. Schematics and Mechanical Drawings
    • 7.1.1.DEBIX Model A/B
    • 7.1.2.DEBIX Model A I/O Board
    • 7.1.3.DEBIX Model A LoRa Board
    • 7.1.4. DEBIX Model A 4G Board

Compute Module Hardware

  • 8.1.Schematics and Mechanical Drawings
    • 8.1.1.DEBIX SOM A
    • 8.1.2. DEBIX SOM A I/O Board

DEBIX Processor

  • 9.1. NXP i.MX 8M Plus
  • 9.2. CPU Command

DEBIX NPU

  • 10.1.Introduction
    • 10.1.1.eIQ ML Software Development Environment®
  • 10.2.Purpose
  • 10.3.Overview
    • 10.3.1.Software Environment
    • 10.3.2.Hardware Overview
    • 10.3.3.CPU versus NPU Performance
  • 10.4.In-depth Breakdown
    • 10.4.1.Warm up time with multiple models running in sequence
    • 10.4.2.OVX Graph Caching
  • 10.5.Conclusion

Reference Documents

  • 11.1.Reference
Getting Started
  • 1.1.Setting up Your DEBIX

    How to set up your DEBIX? You can find DEBIX Ubuntu Installation Guide and UI Demo video.

    To start up your DEBIX, the following accessories are needed:

    • A computer monitor or television(It’s suggested that you use a display with HDMI input, if your display uses an HDMI connection and has built-in speakers, you can use it to output sound).
    • A display cable to connect your monitor to DEBIX.
    • A computer keyboard and mouse(All standard USB keyboards and mouses will work with your DEBIX, wireless keyboards and mice will work if already paired).
    • A good quality power supply(we recommend buying power supply from OKdo). 
      • DEBIX Model SE/A/B/C uses type C power supply;
      • DEBIX SOM A uses DC socket power supply.
    • A Micro SD card(we recommend a minimum of 8GB micro SD card and use Etcher to install an operating system onto it).

    1.1.1. Connecting a Display

    Generally speaking, you will need to connect the DEBIX with a display (a computer monitor or a television). Of course, you can also set your DEBIX headless.


    1.1.1.1. Using HDMI

    The DEBIX has an HDMI port which you can connect directly to a monitor or TV with an HDMI cable.


    If a monitor with built-in speakers are connected to your DEBIX with HDMI cable, you can use it to output sound.


    1.1.1.2. Using DVI

    If your monitors only have a DVI port, you can use an HDMI-to-DVI cable, or an HDMI cable with a DVI adapter.


    Note

    Unlike HDMI the DVI and VGA standards does not support audio.

    1.1.1.3. Using VGA

    If your monitors only have a VGA port, you can use an HDMI-to-VGA adapter.


    1.1.2 Power Supply for DEBIX

    The following table shows the USB-PD power mode required to power various DEBIX models.


    Model Power supply (voltage/current)
    DEBIX Model S
    DC 5V/2A Type-C
    DEBIX Model A
    DC 5V/3A Type-C
    DEBIX Model B
    DC 5V/3A Type-C
    DEBIX Model C
    DC 5V/2A Type-C
    DEBIX SOM A
    DC 3.5V~5V/2A

    1.1.3. Micro SD Card for DEBIX

    DEBIX computers use a Micro SD card.


    1.1.3.1. Recommended Capacity

    We recommend using a Micro SD card with the minimum size of 8GB with DEBIX OS.


    1.1.3.2. Troubleshooting

    We recommend buying a Micro SD card from our official retailers.

    If you are having problems with your Micro SD card:

    • Check the Micro SD card. The best way to avoid fake Micro SD card is to always buy from a reputable supplier.
    • Check the power supply. We recommend using an official DEBIX power supply.
    • The power supply cable may also have problems.
    • Make sure you shut down the operating system correctly before you power down the DEBIX.

    1.1.4. Optional Items

    • A network (Ethernet) cable to connect your DEBIX to your local network and the Internet.

    1.1.5.Troubleshooting

    You can get help with setting up your DEBIX in our Discord Community.

  • 1.2.Installing the Operating System

    DEBIX recommends the use of Etcher to install an operating system on your Micro SD card. You will need another computer with a Micro SD card reader to install the image. We recommend a minimum of 8GB Micro SD card.

    1.2.1. Downloading an Image


    First you need to download the image, then use Etcher tool to write it to the Micro SD card. Official images for recommended operating systems are available for download on the DEBIX website download page.

    You may need to unzip the downloaded file (.zip) to get the image file (.img) you need to write to the card.


    1.2.2. Boot Mode


    1.2.2.1. USB Flash

    Environment preparation:

    • DEBIX device
    • USB data cable
    • DC power cable
    • PC (windows 10/11)

    Step 1. Download system installation package that we provide to DEBIX, check if the MD5 matches after the download is complete, and then unzip it on PC.

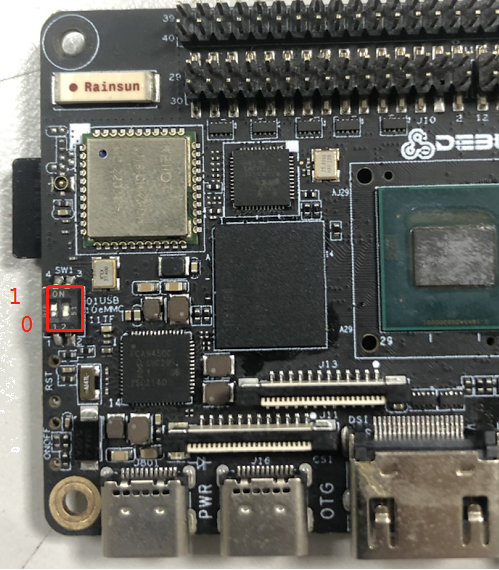
    Step 2. Connect PC to OTG interface of the device using USB cable, press and hold the flash key on device or set DIP switch to “USB mode”, and connect DC power to enter the USB flash mode.

    • USB mode status of DEBIX Model A/B is DIP switch set to “01”
    • USB mode status of DEBIX SOM A I/O Board is DIP switch set to “0001”

    Caution

    The DEBIX Model A mentioned above needs a DIP switch and an eMMC module.

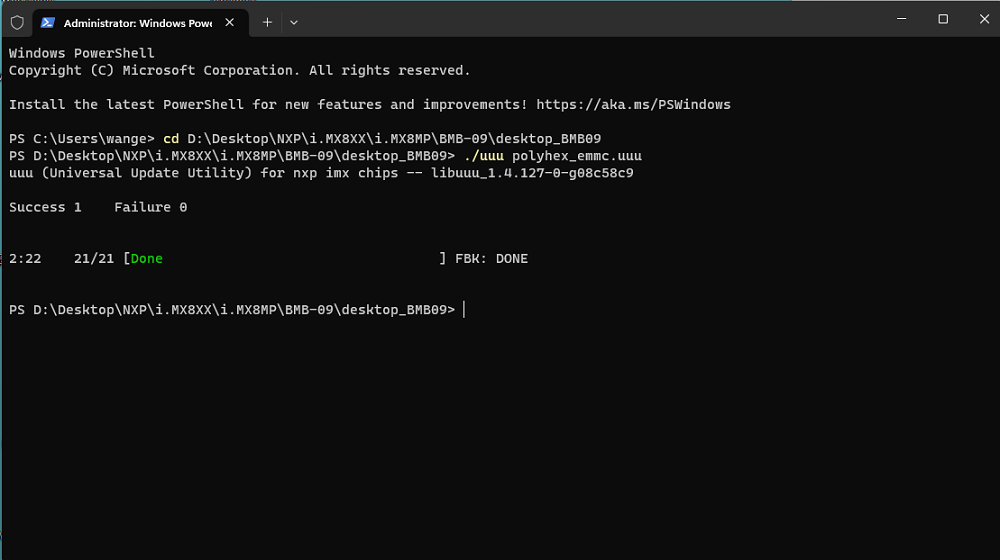
    Step 3. Run Windows PowerShell as administrator.

    Step 4. Type the command to enter the system installation package directory. For example:

    cd D:\Desktop\NXP\i.MX8MP\BMB-09\desktop_BMB09

    The address in the command above is full path of unzipped system installation package.

    Step 5. Run the following command to download file, and start to burn system to eMMC.

    ./uuu polyhex_emmc.uuuu

    If burning Android operating system, please run the following command:

    • Boot from eMMC with 2GB DDR
      ./uuu_imx_android_flash.bat -f imx8mp -a -e
    • Boot from eMMC with 4GB DDR
      ./uuu_imx_android_flash-4g.bat -f imx8mp -a -e
    • Boot from Micro SD with 2GB DDR
      ./uuu_imx_android_flash.bat -f imx8mp -a -e -t sd
    • Boot from Micro SD with 4GB DDR
      ./uuu_imx_android_flash-4g.bat -f imx8mp -a -e -t sd
    • Boot from 32G Micro SD with 2GB DDR
      ./uuu_imx_android_flash.bat -f imx8mp -a -e -t sd -c 28
    • Boot from 32G Micro SD with 4GB DDR
      ./uuu_imx_android_flash-4g.bat -f imx8mp -a -e -t sd -c 28
    • 16G Raspberry Pi 7 inch screen with 2GB DDR
      ./uuu_imx_android_flash.bat -f imx8mp -d rasperrypi-7inch -a -e -t sd
    • 16G Raspberry Pi 7 inch screen with 4GB DDR
      ./uuu_imx_android_flash-4g.bat -f imx8mp -d rasperrypi-7inch -a -e -t sd
    • 32G Raspberry Pi 7 inch screen with 2GB DDR
      ./uuu_imx_android_flash.bat -f imx8mp -d rasperrypi-7inch -a -e -t sd -c 28
    • 32G Raspberry Pi 7 inch screen with 4GB DDR
      ./uuu_imx_android_flash-4g.bat -f imx8mp -d rasperrypi-7inch -a -e -t sd -c 28

    Step 6. Wait for the system burning to end. When the terminal shows green word "Done", it means the burning is finished.

    Step 7. After flash, disconnect the DC power and OTG USB cable, make sure the device is completely disconnected, and then connect the power to start.


    1.2.2.2.Boot from the Micro SD card

    Environment preparation:

    • DEBIX device
    • Micro SD card
    • Card reader
    • DC power cable
    • PC (windows 10/11)

    Step 1. Download Etcher tool on PC.

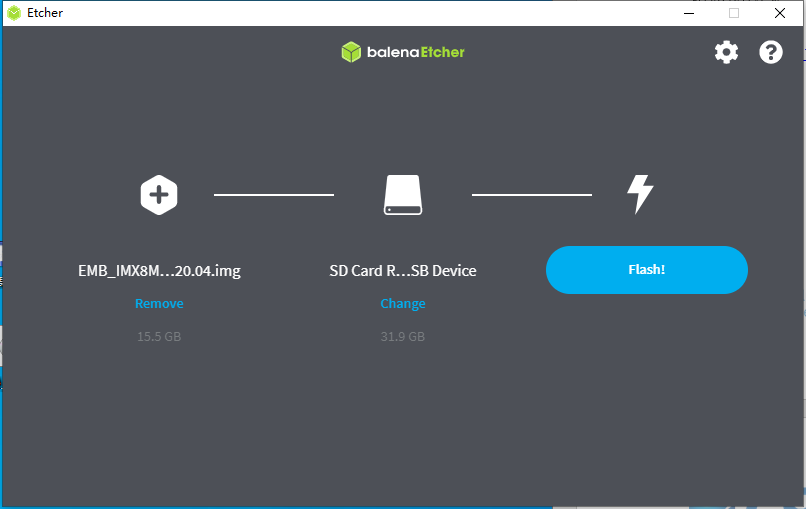
    Step 2. After installation, start Etcher, insert the Micro SD card to PC, select the img file to be installed and the disk partition corresponding to the Micro SD card.

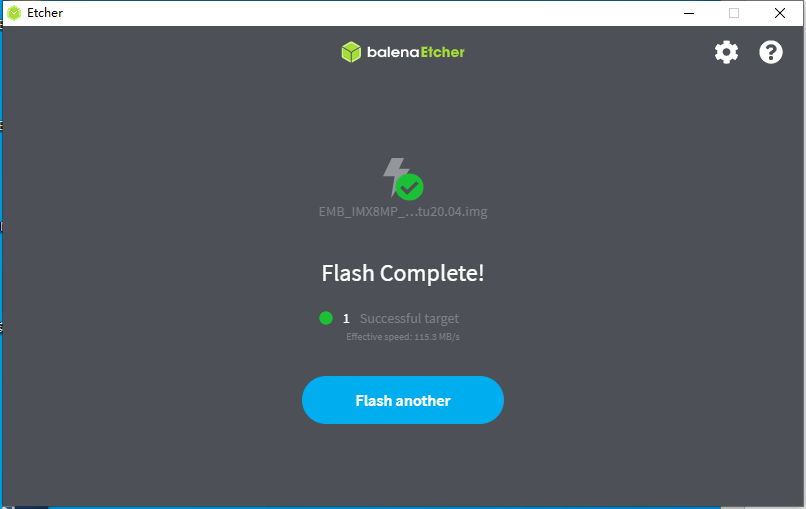
    Step 3. Click Flash! Wait patiently, the program will write the system to the Micro SD card. When "Flash Complete!" appears, it means that the system has been successfully programmed into the Micro SD card.

    Note

    The system may prompt you that the disk is unavailable and needs to be formatted, please ignore it, it is not an error!


    Step 4. Insert the Micro SD card into DEBIX, and turn the onboard DIP switch to “Micro SD card mode”, connect the display device and power on, then you can see the boot screen.

    • Micro SD card mode status of DEBIX Model A/B is DIP switch set to “11”
    • Micro SD card mode status of DEBIX SOM A I/O Board is DIP switch set to “0011”


    1.2.2.3.Boot from eMMC

    Environment preparation:

    • DEBIX device
    • Micro SD card above 16GB
    • Card reader
    • DC power cable
    • PC (windows 10/11)

    Write the downloaded system image to the Micro SD card in steps 1~3 of section 1.2.2.2. Then burn the system to eMMC with the following steps:

    Step 1. Insert the Micro SD card into DEBIX, and turn the onboard DIP switch to “Micro SD card mode”, the system will boot from the Micro SD card, and then turn on the power.

    Step 2. After booting, the system will automatically write to the eMMC through the Micro SD card. This burn process will not be displayed on screen. When burning, the indicator light on the main board will flash quickly. Please wait. When the indicator light changes from fast flashing to slow flashing, the programming is complete.

    Note

    If the system with the same version as the Micro SD card has been burned to eMMC, the system will not be burned again, and the indicator light will not flash quickly.
    Step 3. Then turn off the power and turn the DIP switch to "eMMC mode", the system will boot from eMMC, connect to HDMI and power on, and then system is start.

    • eMMC mode status of DEBIX Model A/B is DIP switch set to “10”
    • eMMC mode status of DEBIX SOM A I/O Board is DIP switch set to “0010”

    Caution

    The DEBIX Model A mentioned above needs a DIP switch and an eMMC module.
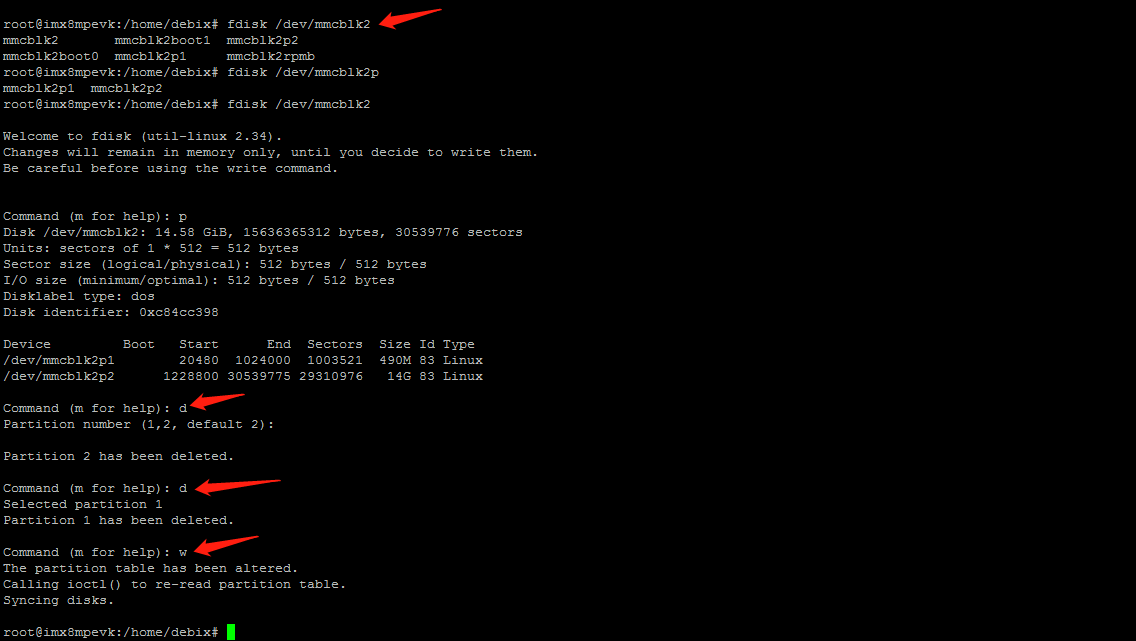
    If you need to flash the eMMC system again, you need to format the eMMC first. Proceed as follows:

    Step 1. Connect the motherboard to the keyboard, mouse and HDMI display, turn the DIP switch to "Micro SD card mode" to start the system from the Micro SD card;

    Step 2. Enter the default username “debix” and password "debix" in the Terminal, to enter the command line, and run the following commands in sequence:

    #sudo su 
    #fdisk /dev/mmcblk2 
    d 
    d 
    w


    Step 3. Repeat step 3 to reprogram the eMMC.

    1.2.3. Installing Images on Linux

    It’s recommended to use Etcher to write images to Micro SD card, so it is a good place to start. If you’re looking for more advanced options on Linux, you can use the standard command line tools below.

    Caution

    When using dd command, you should be very careful, because it may overwrite any partition of your machine.


    1.2.3.1. Unmounting Micro SD Card

    • To check the devices connected to your machine, just run lsblk -p . The output should look like the following: 

    • If your computer has a slot for Micro SD card, insert the card. If not, insert the card into an SD card reader, then connect the reader to your computer.

    • Open the terminal, run lsblk -p again. The new device that has appeared is your Micro SD card, you can also usually tell from the listed device size. The naming of the device will follow the format described in the next paragraph. 


    • As shown in the picture above, the left column of the results from the lsblk -p command gives the device name of your Micro SD card and the names of any partitions on it. It lists device name /dev/mmcblk1 (with partition name /dev/mmcblk1p1). The right column indicates where the partitions have been mounted.

    • If any partitions on the Micro SD card have been mounted, unmount them all with umount, for example umount /dev/mmcblk1p1 (replace mmcblk1 with your Micro SD card’s device name, and change the number for any other partitions).


    1.2.3.2. Copying the Image to Micro SD Card

    Open a terminal, use the following command to write the image to the Micro SD card, do not forget to replace the input file if= argument with the path to your .img file, and the /dev/sdX in the output file of= argument with the correct device name. This is very important, as you will lose all the data on the hard drive if you provide the wrong device name. Make sure the device name is the name of the Micro SD card as described above, not just a partition. For example: mmcblk1, not mmcblk1p1.

    sudo dd if=debix-ubuntu-20211022.img of=/dev/sdX bs=4M conv=fsync


    1.2.3.3. Copying a Zipped Image to Micro SD Card

    It is possible to combine the unzip and Micro SD copying process into one command, The following command unzips the zip file (replace debix-ubuntu-20211022.bz2 with the appropriate zip filename), and pipes the output directly to the dd command. This in turn copies it to the Micro SD card, as described in the previous section.

    bunzip2 -c debix-ubuntu-20211022.bz2 | sudo dd of=/dev/sdX bs=4M conv=fsync


    1.2.3.4. Checking the Image Copy Progress

    By default, the dd command does not give any information about its progress, To see the progress of the copy operation, you can run the dd command with the status option.

    sudo dd if=debix-ubuntu-20211022.img of=/dev/sdX bs=4M conv=fsync status=progress


    1.2.3.5. Optional: Checking Whether the Image was Correctly Written to Micro SD Card

    After dd command is finished, you can check whether the writing process to the Micro SD card has no problem by dd-ing from the card back to another image on your hard disk, truncating the new image to the same size as the original, and then running diff on those two images.

    • If the image is much smaller than the Micro SD card, it’s not needed to read back the whole Micro SD card, since it will be mostly empty. So you need to check the number of blocks that were written to the card by the dd command. At the end of its run, dd will have displayed the number of blocks written as below:
    xxx+0 records in 
    yyy+0 records out

    We need the number xxx, which is the block count. We can ignore the yyy numbers.

    • Copy the Micro SD card content to an image on your hard drive using dd again:
    sudo dd if=/dev/sdX of=from-sd-card.img bs=4M count=xxx

    if is the input file (i.e. the Micro SD card device), of is the output file to which the Micro SD card content is to be copied (which is called from-sd-card.img in the example above), and xxx is the number of blocks written by the original dd operation.

    • In case the Micro SD card image is still larger than the original image, truncate the new image to the size of the original image using the following command (replace the input file reference argument with the original image name):
    sudo truncate --reference debix-ubuntu-20211022.img from-sd-card.img
    • Compare the two images: diff should report that the files are identical.
    diff -s from-sd-card.img debix-ubuntu-20211022.img
    • Run sync. This command will ensure that the write cache is flushed and that it is safe to unmount your Micro SD card.
    • Remove the Micro SD card from the card reader.

    1.2.4. Advanced & Optional: Preparing other Linux (not Ubuntu) on Micro SD card

    Sometimes, maybe you want to prepare your desired Linux system other than the Ubuntu we provided. Then, the u-boot file, kernel, u-boot flash method are as below:

    • Flash u-boot file through command: dd if=imx-boot-imx8mpevk-sd.bin-flash_evk of=/dev/mmcblk1 bs=1k seek=32 conv=fsync, substitute the device name(/dev/mmcblk1) with your corresponding one.
    • kernel: github.com/9278978/debix-kernel

    1.2.5. Installing Images on Mac OS

    It’s recommended to use Etcher to write images to SD cards. However, if you do not want to use the Etcher tool, you can still copy an operating system to the card from the command line.


    1.2.5.1. Finding Micro SD Card

    Insert the Micro SD card into the slot, or connect the Micro SD card reader with the Micro SD card inside, and type diskutil list at the command line. You should see the following like this:

    Here the Micro SD Card is /dev/disk2. However your disk and partition list may vary.


    1.2.5.2. Copying the Image

    Warning

    If you specify the wrong disk device when using the dd command, you may overwrite your Mac’s operating system. If you’re not sure about what to do, we recommend you use the Etcher.
    You should unmount the Micro SD card before copying the image.

    diskutil unmountDisk /dev/diskN

    Then copy the image.

    sudo dd bs=1m if=path_of_your_image.img of=/dev/rdiskN; sync

    Remember to replace N with the disk number. Do not provide a compressed image(e.g. *.img.bz2) in the above command, or the image copied to the Micro SD card will not boot.

    Note

    Use rdisk (which stands for 'raw disk') instead of disk will make the copying faster.
    This can take a few minutes, depending on the image file size. After the dd command finishes, you can eject the card:

    sudo diskutil eject /dev/rdiskN

    1.2.5.3. Troubleshooting

    • If the following error occurs dd: /dev/rdiskN: Resource busy, you need to unmount the volume first sudo diskutil unmountDisk /dev/diskN.
    • If the following error occurs dd: bs: illegal numeric value, change the block size bs=1m to bs=1M.
    • If the following error occurs dd: /dev/rdiskN: Operation not permitted, go to System Preferences--> Security & Privacy --> Privacy --> Files and Folders --> Give Removable Volumes access to Terminal.
    • If the following error occurs dd: /dev/rdiskN: Permission denied, the partition table of the Micro SD card is being protected against being overwritten by mac OS.

    You can use the following command to erase the Micro SD card’s partition table:

    sudo diskutil partitionDisk /dev/diskN 1 MBR "Free Space" "%noformat%" 100%

    That command will also set the permissions on the device to allow writing, after running this command, you will get the output like this:

    1.2.6. Installing Images on Windows

    The balenaEtcher is our recommended option for most users to write images to Micro SD card, so it is a good place to start. Alternatively, you can also use Win32DiskImager.


    1.2.6.1. balenaEtcher

    • Download the balenaEtcher tool
    • Run balenaEtcher and select the corresponding unzipped OS image file
    • Select the Micro SD card drive
    • Finally, click Flash! to write the corresponding OS image to the Micro SD card

    • You’ll see a progress bar. Once complete, a notification “Flash Complete!” will show, the utility will automatically unmount the Micro SD card so it’s safe to remove it from your computer.


    1.2.6.2. Win32DiskImager

    • Insert the Micro SD card into card reader. If you have a Micro SD card slot or a Micro SD adapter in a USB port, you can also use them. Please remember the drive letter assigned to the Micro SD card. You can see the drive letter in the left hand column of Windows Explorer, for example E:.
    • Download the Win32DiskImager utility and install it.
    • Run the Win32DiskImager utility from your desktop or menu. In the interactive dialogue, select the image file you extracted earlier; In the device box, select the drive letter of the Micro SD card. Be careful to select the correct drive: if wrong drive is chosen, you may destroy the data on your computer’s hard disk! If you are using a Micro SD card slot in your computer, and can’t see the drive in the Win32DiskImager window, try using an external Micro SD adapter.
    • Click Write and wait for the write to complete.
    • Exit the imager and eject the Micro SD card.

    1.2.7. Make an Image


    1.2.7.1. For Micro SD card boot

    Environment preparation:

    • 1 x Micro SD card reader
    • 1 x Micro SD card
    • computer or virtual machine with Linux system

    Step 1. Insert the Micro SD card that can boot normally into the computer with Linux environment.

    Step 2. In the terminal window, type the command sudo su to switch to the administrator user.

    Step 3. Type the following command to start making an image.

    dd if=/dev/sdb of=/root/backup.img

    Note

    Due to the size of the generated image depends on the size of the Micro SD card, please modify the sd* drive letter according to the actual situation.

    Step 4. Then you can use the tool called balenaEtcher to write the img file to the Micro SD card.

    Step 5. Insert the Micro SD card into the motherboard, and power on to verify.


    1.2.7.2. For eMMC boot

    Note

    This section only applies to DEBIX Model B and DEBIX SOM A IO Board.

    The same applies to DEBIX Model A with DIP switch and eMMC module.

    Environment preparation:

    • 1 x Micro SD card reader

    • computer or virtual machine with Linux system

    • 2 x Micro SD card of at least 16GB size

    Caution

    Please make sure you fully understand all the contents of this document before proceeding, proceeding blindly may result in data loss.

    Step 1. Enter DEBIX official website downloads page, download the system image (Boot from SD Card).

    Step 2. Then you can use the tool called balenaEtcher to write the system image to the Micro SD card. For the detailed flash method, please refer to the burning tutorial in the corresponding motherboard user manual.

    Step 3. Insert the Micro SD card into the motherboard, and power on, the system will boot from Micro SD card.

    Step 4. Enter the system desktop, and switch to the administrator user via sudo su command.

    Step 5. Create a folder to mount the eMMC file system and boot partition.

    mkdir -p /mnt/fat32 
    mkdir -p /mnt/ext4

    Step 6. Mount the partition of eMMC.

    mount /dev/mmcblk2p1 /mnt/fat32/ 
    mount /dev/mmcblk2p2 /mnt/ext4/

    Step 7. Enter the ext4 directory and pack the file system.

    cd /mnt/ext4 
    tar -cjpf ../imx-image-desktop-imx8mpevk.tar.bz2 ./*

    Step 8. Enter the fat32 directory and pack the boot partition.

    cd /mnt/fat32 
    tar -cpf ../boot.tar ./*

    Step 9. Now the Micro SD card contains the file system and boot backed up from eMMC.

    Step 10. Transfer over the network or insert the Micro SD card into a computer with Linux system to copy the backup files to the computer.

    Note

    If no Linux environment, you can operate the Micro SD card by booting the motherboard from eMMC.
    Step 11. Pull out the Micro SD card and insert it to the motherboard, it will burn the new system into eMMC.

    Step 12. After booting, insert the Micro SD card into PC with Linux or the motherboard with eMMC and mount the Micro SD card.

    mount /dev/sda2 /mnt/ext4

    Note

    Pay attention to change the Micro SD card's disk character display in Linux system.
    Step 13. Unzip the backup boot partition.

    mkdir boot 
    tar -xpf boot.tar -C boot/

    Step 14. Copy the file system, the extracted device tree and kernel files to the corresponding directory in the Micro SD card.

    Note

    When copying, there may be an error indicating insufficient space. Please expand the ext4 partition on the Micro SD card appropriately in advance.

    cp -ar boot /mnt/ext4/upgrade/ 
    cp imx-image-desktop-imx8mpevk.tar.bz2 /mnt/ext4/upgrade/

    Step 15. Generate md5 value of the file system.

    cd /mnt/ext4/upgrade 
    md5sum imx-image-desktop-imx8mpevk.tar.bz2 > rootfs.md5

    Step 16. Pull out the Micro SD card and insert it to the motherboard, it will burn the new system into eMMC.

  • 1.1.2. Power Supply for DEBIX

    The following table shows the USB-PD power mode required to power various DEBIX models.


    Model Power supply (voltage/current)
    DEBIX Model SE
    DC 5V/2A Type-C
    DEBIX Model A
    DC 5V/3A Type-C
    DEBIX Model B
    DC 5V/3A Type-C
    DEBIX Model C
    DC 5V/2A Type-C
    DEBIX SOM A
    DC 3.5V~5V/2A
  • 1.3.View Version

    Via the DebixVersion command, you can check the hardware version, system version, MCU version, WiFi address, Bluetooth address, kernel version, memory size, and CPU frequency of the device, as shown in the following figure:

DEBIX OS Related
  • 2.1.Introduction

    DEBIX OS is a free operating system based on Ubuntu. We are continuously optimizing this OS to meet the needs of developers and users.

  • 2.2.Updating DEBIX OS

    It’s suggested that you update your DEBIX OS regularly to keep your software up to date. Every several days, the DEBIX OS will release a new version that may contain new features or have fixed several bugs. Right now, DEBIX only support upgrading the OS through re-burning the image to the Micro SD card.

    2.2.1.Using APT

    On Ubuntu(which DEBIX OS used), the easiest way to manage packages is using the apt command line tool from a Terminal window.


    2.2.1.1 Keep your DEBIX OS up to Date

    A list of software sources are kept by APT on DEBIX in the file /etc/apt/sources.list. Before installing software, It’s needed to run command apt update to update the package list:

    sudo apt update

    Generally speaking, doing this will keep your installation up to date for the particular major DEBIX OS release you are using. It will not update from one major release to another. This upgrade command only updates the already installed packages, it will not update the DEBIX system, it’s needed to re-burn the updated image to the Micro SD card to upgrade to the latest DEBIX system.


    2.2.1.2. Running out of Space

    You'd better run the command df -h to check the free disk space. If the remaining space of the disk is not enough for upgrading, use command sudo apt auto-clean to free up some space.


    2.2.1.3. Searching for Software

    Using a given keyword, you can search the archives for a package with command apt-cache search:

    More information about a package can be gotten through command apt-cache show:

    apt-cache show ssh 
    Package: ssh 
    Architecture: all 
    Version: 1:8.2p1-4 
    Multi-Arch: foreign 
    Priority: optional 
    Section: net 
    Source: openssh 
    Origin: Ubuntu 
    Maintainer: Ubuntu Developers <ubuntu-devel-discuss@lists.ubuntu.com> 
    Original-Maintainer: Debian OpenSSH Maintainers <debian-ssh@lists.debian.org> 
    Bugs: https://bugs.launchpad.net/ubuntu/+filebug 
    Installed-Size: 117 
    Pre-Depends: dpkg (>= 1.17.5) 
    Depends: openssh-client (>= 1:8.2p1-4), openssh-server (>= 1:8.2p1-4) 
    Filename: pool/main/o/openssh/ssh_8.2p1-4_all.deb 
    Size: 5072 
    MD5sum: 8458a9ef29438a18bc9b5147b8c07c21 
    SHA1: aaaadb79c9d54f3b74d0c5ad6248f364514384ef 
    SHA256: 0b95e6a28e5d081c277ec84217c4662546e58b2ea9a498533bdbcea8f835fb67 
    Homepage: http://www.openssh.com/ 
    Description-en: secure shell client and server (metapackage) 
    This metapackage is a convenient way to install both the OpenSSH client 
    and the OpenSSH server. It provides nothing in and of itself, so you 
    may remove it if nothing depends on it. 
    Description-md5: b00e309365895c14a10af55945efb136


    2.2.1.4. Installing a Package with APT

    sudo apt install qtwayland5

    After typing this command, the terminal may prompt you to enter Y to continue the installation. You can bypass the this interaction by adding the -y flag to the command:

    sudo apt install qtwayland5 -y


    2.2.1.5. Uninstalling a Package with APT

    You can uninstall a package with apt remove:

    sudo apt remove qtwayland5

    After executing this command, you will be prompted to confirm the removal. If you provide -y option in the command line, the command will auto-confirm.

    If you do not need this package any longer, you can completely remove the package via apt purge command:

    sudo apt purge qtwayland5
  • 2.3.Playing Audio and Video
    The simplest way of playing audio and video on DEBIX is to use the installed Videos application.
  • 2.4.Using a USB webcam

    You can use a standard USB webcam to take pictures and videos on DEBIX.

    Run the following command to install package fswebcam:

    sudo apt install fswebcam

    Run the following command to install v4l-utils:

    sudo apt install v4l-utils

    Run the following command to check the devices controlled by v4l2:

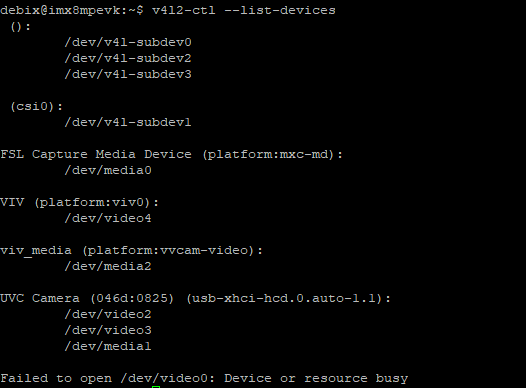
    v4l2-ctl --list-devices

    The output of running v4l2-ctl --list-device command should be like this:


    You can find the corresponding device node of the camera.

    If you are not using the default debix user account, you need to add your username to the video group, or the ‘permission denied’ error will occur (run the following command using debix user account):

    sudo usermod -a -G video <username>

    2.4.1.fswebcam Basic Usage

    The following examples are finished using the debix user account.

    Use the following command to take a picture and save it to the specified location:

    fswebcam -d /dev/video2 -r 640x480 /home/debix/image.jpg

    You should substitute the value ‘/dev/video2’ of option ‘-d’ to the corresponding one which is shown in the output of command v4l2-ctl --list-devices


    If you do not want the banner with timestamp appear in your image, you can add ‘--no-banner’ option:

    fswebcam -d /dev/video2 -r 640x480 --no-banner /home/debix/image.jpg

    Note

    The ‘--no-banner’ option should be located before ‘/home/debix/image.jpg’, otherwise, the banner with timestamp will still appear.

    2.4.2.Using Cheese

    You can also use the application Cheese on the desktop of DEBIX to take pictures and record videos. Just click Cheese application from the desktop to open it, and try it in your way.

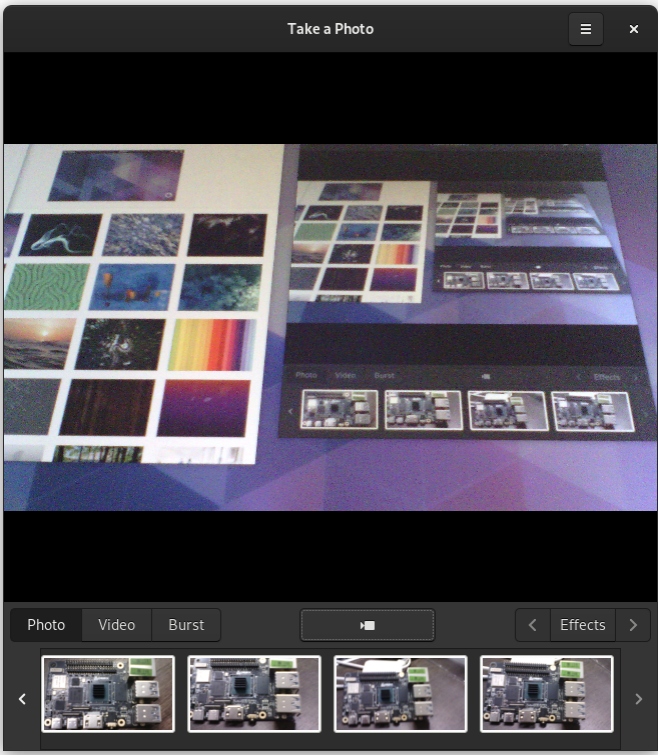
    In the "Take a Photo" window of Cheese tool, you can see the image, press the button   to take a picture, and the photo is saved in the default path of “/home/Pictures”; at the same time, you can choose "Effects" to adjust the image window background. As shown in the figure below:


    Select "Video" to take a video, select "Burst" to take multiple photos, and click the picture taken below to preview.

    2.4.3.Using mplayer

    sudo apt update 
    sudo apt install mplayer 
    mplayer tv:// -tv driver=v4l2:device=/dev/video2:width=640:height=480:fps=50 -vo x11

    Note

    The mplayer command cannot be executed remotely, you should run it from the desktop. Remember to substitute the ‘device=/dev/video2’ option with your corresponding one, which can be checked in the output of command v4l2-ctl --list-devices.
    For more usage of mplayer, you can find it on the internet.

    2.4.4.Using python3-opencv

    Alternatively, you can write python scripts to open USB cameras.

    sudo apt update 
    sudo apt install python3-opencv

    Create python script with the name of ‘camera_test.py’, of course, you can use your desired name. Put the following content into the script:

    #!/usr/bin/python3 
    import cv2 
    # select /dev/video2 
    cap = cv2.VideoCapture(2) 
    cap.set(cv2.CAP_PROP_FRAME_WIDTH, 800) 
    cap.set(cv2.CAP_PROP_FRAME_HEIGHT, 600) 
    cap.set(cv2.CAP_PROP_FPS, 20) 
    winname="capture" 
    while True: 
        ret, frame = cap.read() 
        cv2.imshow(winname, frame) 
        k = cv2.waitKey(1) 
        if cv2.getWindowProperty(winname, cv2.WND_PROP_AUTOSIZE) < 1: 
            break 
        elif k == 27: 
            break 
    cap.release() 
    cv2.destroyAllWindows() 

    Note

    The ‘cap = cv2.VideoCapture(2)’ corresponds to ‘/dev/video2’, you should substitute it with the correct value, which can be checked in the output of command v4l2-ctl --list-devices.
    Finally, run the script through command python3 camera_test.py.

  • 2.5.Python

    Python is designed in 1990 and is an substitution of ABC, it is a powerful programming language. Python provides efficient advanced data structure and it can also provide object-oriented programming. It is an explanation language, it has been widely used to write scripts and develop applications on various platforms. With its development, it’s also be used in large projects.

    2.5.1.Basic Python usage

    Hello world in Python:

    print("Hello world")


    2.5.1.1. Indentation

    Python uses indentation for nesting. For example a function definition in Python:

    def print_hello(): 
        print("Hello")

    It's needed to add indentation here. The second indented line is a part of the loop. If another line is added without indentation, the newly added line does not belong to the loop. For example:

    for i in range(2): 
        print("Hello, 1") 
        print("Hello, 2")

    would print:

    Hello, 1 
    Hello, 2 
    Hello, 1

    However, if the following codes are used:

    for i in range(2): 
        print("Hello, 1") 
    print("Hello, 2")

    would print:

    Hello, 1 
    Hello, 1 
    Hello, 2


    2.5.1.2. Variables

    To define a variable and give the variable a value, you can do like this:

    color = "blue" 
    size = 20

    Note

    data types were not specified with these variables, as types are inferred, and can be changed later.

    size = 20 
    size += 1 # increment size by 1 
    print(size) 

    Note

    There is a comment in the second line. In python, comments are started with sign #.


    2.5.1.3. Comments

    If you want to use single line comment, you can put a # sign at the beginning of the line. Whereas, if you want to use multi-line comments, you need to use triple quotes as below:

    """ 
    This program is used to print Hello. 
    It’s very simple. 
    """ 
    print("Hello") 


    2.5.1.4. Lists

    Lists are collections of data of any type, python use lists to store data:

    shapes = ["circle", "rectangle", "square"]
    Square brackets [] are used to denote lists, each item in the list is separated by a comma.


    2.5.1.5. Iteration

    If a data type is iterable, it means that you can loop over the values they contain. 

    • Take a list for example:

    shapes = ["rectangle", "square", "circle"] 
    for shape in shapes: 
        print(shape) 

    This takes each item in the list shapes and prints out the item:

    rectangle 
    square 
    circle 

    In the above example, the word shape is used to denote each item in the list. You can also choose another word. It’s recommended that you choose descriptive words for variables, using singular form for each item, and plural form for lists, thus the readers can understand them easier.

    • Other data types are iterable, for example the string:

    door_color = "orange" 
    for char in door_color: 
        print(char) 

    This loops over each character and prints them out:

    o 
    r 
    a 
    n 
    g 
    e


    2.5.1.6. Range

    However, the integer data type is not iterable and trying to iterate over it will produce an error. For example:

    for i in 3: 
        print(i) 

    The following error will occur:

    TypeError: 'int' object is not iterable 

    However you can make an iterable object using the range function:

    for i in range(3): 
        print(i) 

    Note

    The range(6) contains the numbers 0, 1, 2, 3, 4 and 5 (six numbers in total). To get the numbers 2 to 7 (inclusive) use range(2, 8).


    2.5.1.7. Length

    To find the length of a string or a list, you can use functions like len:

    color = "purple" 
    print(len(color)) # 6 
    shapes = ["rectangle", "circle", "square", "triangle"] 
    print(len(shapes)) # 4 


    2.5.1.8. If statements

    Just like the other programming languages , python also has if statements, you can use if statements for control flow:

    color = "blue" 
    if len(color) > 3: 
        print("The color is,") 
        print(color) 
    else: 
        print("That color name is short,") 
        print(name) 

    2.5.2.Using Command Line

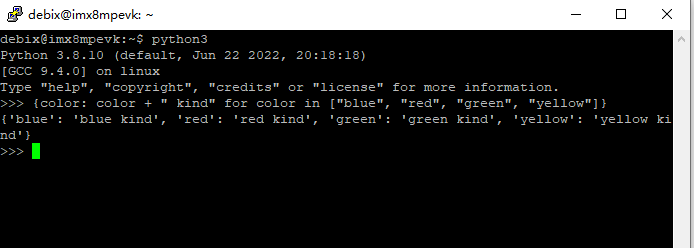
    Create a python file with certain contents, then you can execute it from the command line with command python3, e.g. python3 hello.py. An example is given in the following image.


    2.5.3.Other Ways of Using Python

    You can access the standard built-in python shell through command python3 in the terminal. This shell does not have syntax highlighting or autocompletion. You can look back on the history of the commands you’ve entered by using the Up and Down keys. Use Ctrl + D or command exit() to exit.


    2.5.3.1. IPython

    IPython is an interactive python shell which supports auto-completion and auto-indentation. There are various useful built-in functions. You can install it through the following commands:

    sudo apt install python3-pip 
    sudo pip install ipython 

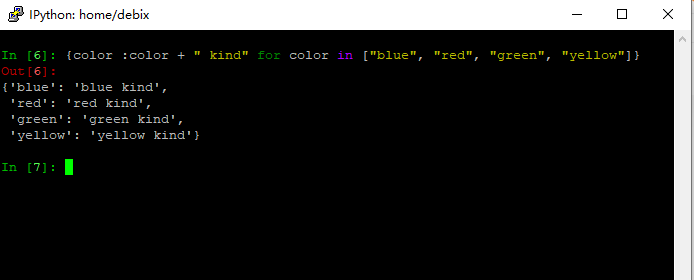
    Run command  ipython from the command line, just use it the same as using python3. ipython has more features. Try typing range? and hitting Enter. You're shown information including the docstring for the range function:

    You can try the following dictionary comprehension:

    {color: color + "kind" for color in ["blue", "red", "green", "yellow"]}

    This will pretty print the following:

    {'blue': 'blue kind', 
    'red': 'red kind', 
    'green': 'green kind', 
    'yellow': 'yellow kind'} 

    In the standard Python shell, this would have printed on one line:

    {'blue': 'blue kind', 'red': 'red kind', 'green': 'green kind', 'yellow': 'yellow kind'}

    The history of the commands you have entered can be accessed through Up and Down keys. If you exit ipython and return, the command history is still there, you can also access them through Up and Down keys. Use Ctrl + D or exit() to exit.

    2.5.4.Installing Python Libraries

    You can use command pip to install packages from the Python Package Index (known as PyPI). You need to install pip first:

    sudo apt install python3-pip

    Then install Python packages (e.g. qtwayland5) with pip3:

    sudo pip install qtwayland5
  • 2.6.GPIO and the 40-pin Header

    First of all, here is a DEBIX GPIO video tutorial that you can learn about it.

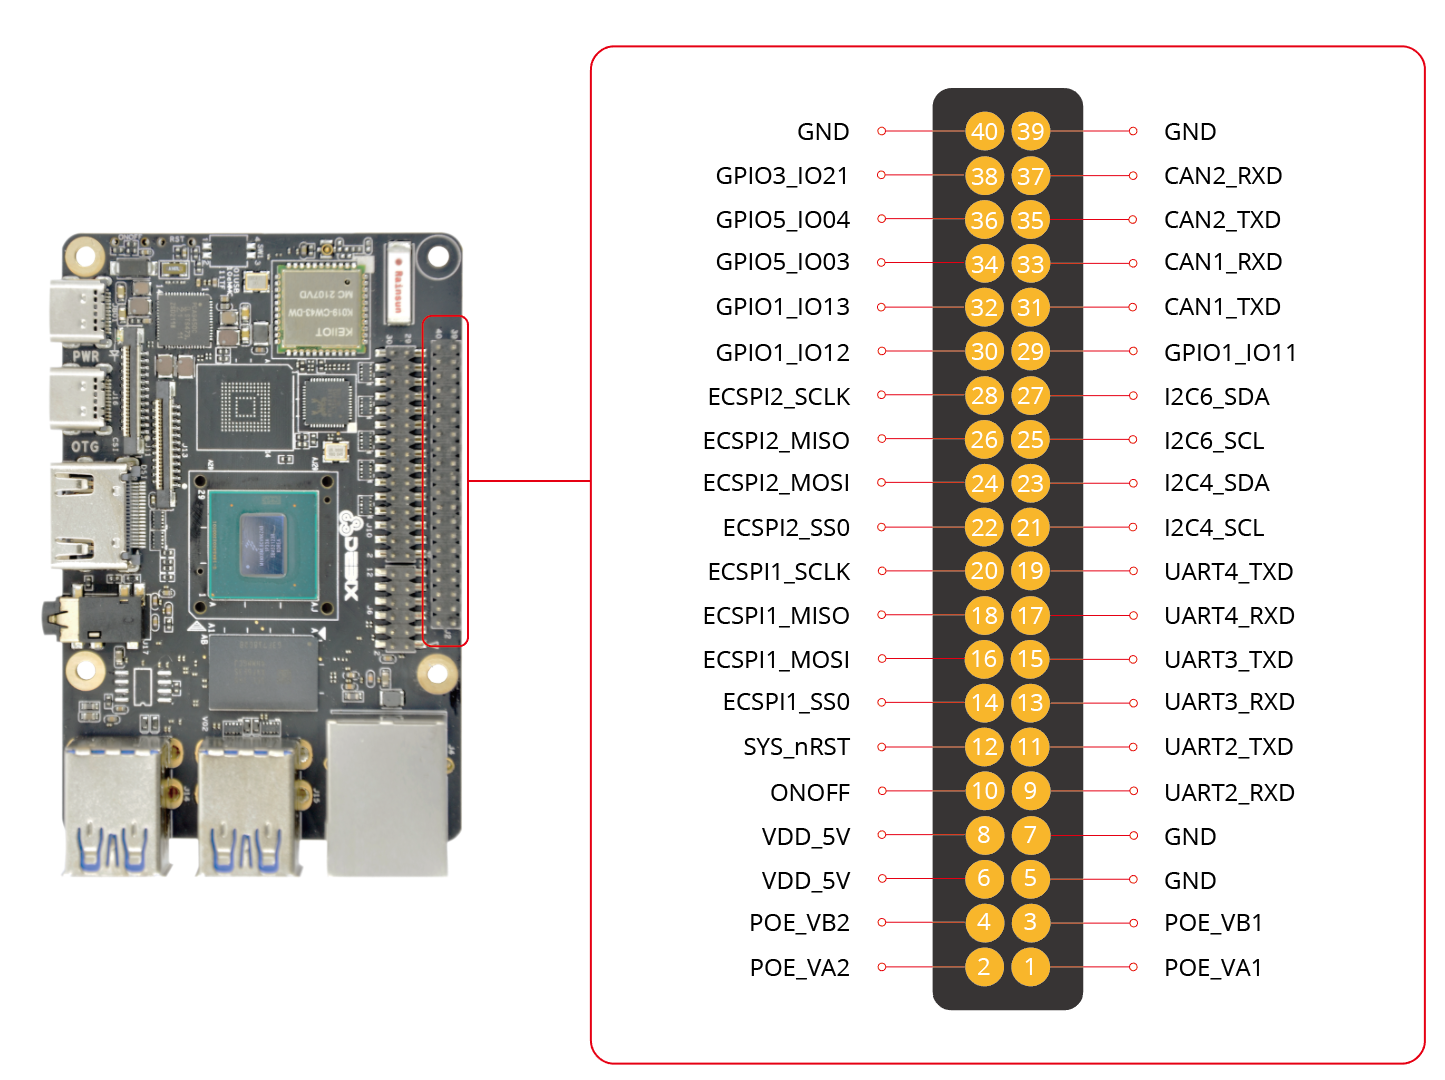
    A 40-pin headers along the edge of Debix boards. They are called the GPIO(general-purpose input/output) pins.

    You can set the GPIO pins as input or output pins according to your needs. The numbering of the GPIO pins follows the default function numbering sequence of DEBIX, for example, UART/SPI/I2C/CAN/GPIO, i.e., the net aliases of J2 defined in DEBIX schematics, if changes to the default configuration are needed, software configuration is required.

    2.6.1.Voltages

    There are two 5V pins, four special POE pins, one ON/OFF pin, one RESET signal pin, as well as four ground pins(0V), which are not configurable. The electronic parameters of the remaining pins are 0~3.3V voltage range, which means that the outputs can be set to as high as 3V3 and inputs are 3V3-tolerant.

    2.6.2.Outputs

    A GPIO pin designated as a general output pin can send 3V3 voltage or 0V voltage.

    2.6.3.Inputs

    A GPIO pin designated as a general input pin can read 0V voltage or 3V3 voltage.

    2.6.4.More

    As well as simple input and output devices, the GPIO pins can be used with a variety of alternative functions, some are available on all pins, others on specific pins.

    • PWM (pulse-width modulation)
      • Software PWM available on all pins
      • Hardware PWM available on GPIO1_IO11, GPIO1_IO13
    • SPI
      • SPI1: ECSPI1_SS0, ECSPI1_MOSI, ECSPI1_MISO, ECSPI1_SCLK
      • SPI2: ECSPI2_SS0, ECSPI2_MOSI, ECSPI2_MISO, ECSPI2_SCLK
    • I2C
      • I2C4_SCL, I2C4_SDA
      • I2C6_SCL, I2C6_SDA
    • Serial
      • UART2_RXD, UART2_TXD, system debug serial port as default
      • UART3_RXD, UART3_TXD
      • UART4_RXD, UART4_TXD

    2.6.5.GPIO debix-gpio

    DEBIX OS has built-in GPIO interface operation command, you can set GPIO by GPIO command.

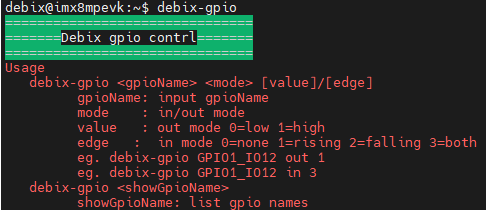
    • In the terminal window, type command debix-gpio to print out the use of GPIO as follows:

    Command Format: debix-gpio <gpioName> <mode> [value]/[edge]

    • gpioName: GPIO interface name, for example: GPIO1_IO11
    • mode: GPIO mode, respectively out (output) and in (input)
    • value: When mode is out (output), the value attribute takes effect; the value can be 0 or 1, 0 means output low level, 1 means output high level
    • Edge: When mode is in (input), the edge attribute takes effect; there are 4 GPIO states: 0-none, 1-rising, 2-falling, 3-both
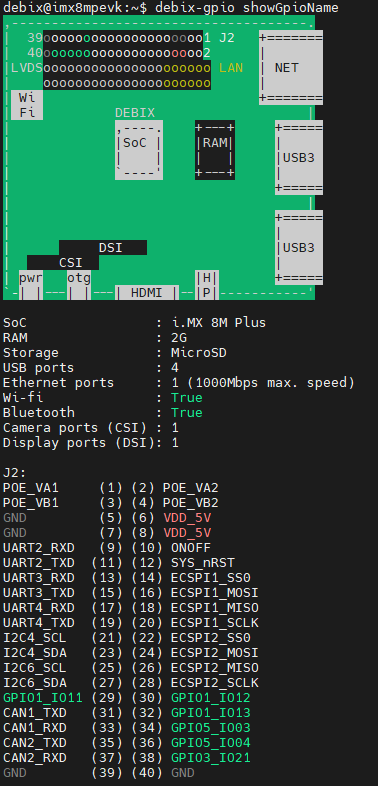
    • Type command debix-gpio showGpioName to print out the definition of the GPIO interface and the location on the board, as follows:

System Configuration
  • 3.1.Configuring Networking

    There are two approaches to set wireless connections in DEBIX OS. One approach is through a GUI on DEBIX Desktop. The other approach is from the command line.

    3.1.1.Via the desktop

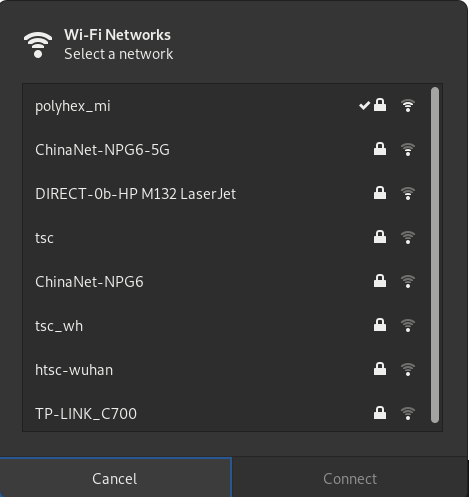
    By default, the wireless connections is enabled. In the upper right corner of DEBIX desktop, there are a group of icons together, including Ethernet icon, sound icon and power icon. Click the group of icons, unwrap the Wi-Fi Not Connected menu and click the Select Network sub-menu, the dialogue listing all available wireless networks will show as below:

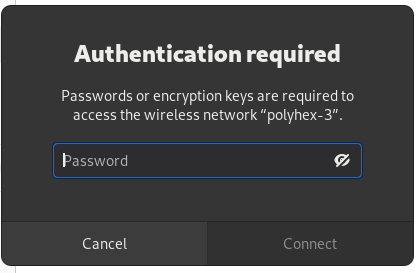
    The lock icons on the right side show whether a network is secured or not, and the icons on the right of the locks give an indication of the network signal strength. Click the network that you want to connect to, if the network you selected is secured, a dialogue box will prompt you to enter the network password:

    Input the password and click Connect then wait for a while. If the network icon is flashing, it means that the wireless connection is being created. Once the network icon stops flashing and show the signal strength, it reveals that the network connection is OK and you can go to surf on the internet.

    3.1.2.Via the Command Line


    3.1.2.1 Getting Wireless LAN Network Details

    You need to run command sudo apt install wireless-tools to install iwlist to scan wireless networks. Run command sudo iwlist wlan0 scan, all available wireless networks, along with other useful information will occur, e.g., part of the output of command sudo iwlist wlan0 scan is as below:

    In the above picture:

    • 'ESSID:"polyhex_mi1"' is the name of the wireless network.
    • 'IE: IEEE 802.11i/WPA2 Version 1' is the authentication used. To use this wireless network, you need to know the password of this network. The ESSID (ssid) for the examples below is polyhex_mi1 and the password (psk) is bohai2021.


    3.1.2.2 Adding the Network Details

    • Create the wpa-supplicant configuration file:

    sudo touch /etc/wpa_supplicant/wpa_supplicant.conf

    • Add the following content to the configuration file, please remember to substitute the ssid value and psk value with your own values:
    network={
        ssid="polyhex_mi1"
        psk="bohai2021"
    }

    The password can be given in plain text as the content provided above. The password can also be given as a pre-encrypted 32byte hexadecimal number, to get the corresponding pre-encrypted 32byte hexadecimal number, use utility wpa_passphrase. For example, you can generate the PSK with wpa_passphrase "polyhex_mi1", Then you will need to input the password of the wireless network "polyhex_mi1" (in this case bohai2021). The output is as follows:

    network={ 
        ssid="polyhex_mi1" 
        #psk="bohai2021" 
        psk=6c8ba976985110ccf61b592ad11889036ed9e5859c868144e447bfe248a058d9 
    } 

    To avoid revealing your wireless network password, you need to delete the plain text password line which is commented out. The wpa_passphrase tool requires a password with between 8 and 63 characters. If you want to use a more complex password, you can extract the content of a text file and use it as input for wpa_passphrase. Store the password in a text file and input it to wpa_passphrase by calling wpa_passphrase "polyhex_mi" < file_where_password_is_stored.


    3.1.2.3 Connecting to the wireless network

    • Insert the Ethernet cable to connect to the internet, run command sudo apt install isc-dhcp-client to get dhclient command, once finished installing isc-dhcp-client, unplug the Ethernet cable.
    • Run command sudo wpa_supplicant -i wlan0 -B -c /etc/wpa_supplicant/wpa_supplicant.conf

    Note

    If there is a notification shows that the device is busy, run command sudo killall wpa_supplicant, and then run the wpa_supplicant command above again.
    • Run command sudo dhcient wlan0 (Note, if there is no wlan0 in the output of command ifconfig, you need to run sudo ifconfig wlan0 up beforehand)

    You can verify whether the wireless network has been successfully connected through surfing on the internet without plugging in the Ethernet cable. If you cannot access the internet, check whether your password and ESSID are correct.


    3.1.2.4 Using Unsecured Networks

    It’s recommended that you take care to use unsecured networks. If you are connecting to a wireless network that does not use a password, the wpa_supplicant entry for the network will need to include the correct key_mgmt entry. For example:

    network={ 
        ssid="polyhex_mi1" 
        key_mgmt=NONE 
    } 


    3.1.2.5 Hidden Networks

    If you want to use a hidden network, you need to use scan_ssid in the wpa_supplicant file, for example, your wpa_supplicant.conf should be look like this:

    network={ 
        ssid="yourHiddenSSID" 
        scan_ssid=1 
        psk="Your_wireless_network_password" 
    } 
  • 3.2.Setting up a Routed Wireless Access Point

    On DEBIX, you can set a routed wireless access point through the app “DEBIX Wifi AP” on the desktop. Just double click it, and input the AP name, AP password, and sudo password following the given wizard.

    Alternatively, you can also set the routed wireless access point in the command line, use command debix_wifi_ap, input the sudo password, AP name and AP password, the access point will be created.

    And you can check whether the access point is set up successfully through connecting to the created AP with your desktop computer or mobile phone.

  • 3.3.Configure HDMI

    Generally speaking, you can connect your HDMI-equipped monitor with DEBIX using a standard HDMI cable. DEBIX can drive one display, with a resolution up to 3840 x 2160.

  • 3.4.Rotating the Display
    You can rotate your display from the desktop on DEBIX. Open Settings then Displays and then set the Orientation to your desired value.
  • 3.5.Configure external storage

    As for external hard disk, SSD or USB stick, you can connect them to any of the USB ports on DEBIX, then mount the file system to access the data stored on it.

    3.5.1.Mounting a Storage Device

    The storage device can be mounted at a specific folder location. The /mnt folder is usually used to do this, e.g. /mnt/mydisk. Note that the folder must be empty.

    • Insert the storage device into a USB port of DEBIX.
    • Run command sudo lsblk -o UUID,NAME,FSTYPE,SIZE,MOUNTPOINT,LABEL,MODEL to list all the disk partitions.
      • Use the SIZE, LABEL, and MODEL columns to identify the name of the disk partition that points to your storage device. For example, sda1.
      • The FSTYPE column contains the filesystem type. If your storage device uses an exFAT file system, you need to install the exFAT driver, just run command sudo apt update, sudo apt install exfat-fuse , If your storage device uses an NTFS file system, you will have read-only access to it. If you want to write to the device, you can install the ntfs-3g driver: sudo apt update; sudo apt install ntfs-3g
      • To get the location of the disk partition, run command sudo blkid

    Take /dev/sda1 as an example.

    • Run command sudo mkdir /mnt/mydisk to create a target folder to be the mount point of the storage device. The mount point here is named mydisk. You can specify your desired name:
    • Run command sudo mount /dev/sda1 /mnt/mydisk to mount the storage device at the mount point you created.
    • Run command ls /mnt/mydisk to verify that the storage device is mounted successfully by listing the contents.

    3.5.2.Configuring Automatic Mounting

    The location where the storage device will be automatically mounted when DEBIX starts up can be defined in fstab file. In the fstab file, the disk partition is identified by the universally unique identifier (UUID).

    • Run command sudo blkid to get the UUID of the disk partition:
    • Find the disk partition from the list and note the UUID. For example, 68BA-C562.
    • Run command sudo vim /etc/fstab to open the fstab file
    • Add the content UUID=68BA-C562 /mnt/mydisk fstype defaults,auto,users,rw,nofail 0 0 to the fstab file, replace fstype with the type of your file system, which you found in the part of 'Mounting a storage device' above, for example: ntfs
    • If the filesystem type is FAT or NTFS, add, umask=000 immediately after nofail - this will allow all users full read/write access to every file on the storage device.

    Now that you have set an entry in fstab, you can start up your DEBIX with or without the storage device attached. Before you unplug the device you must either shut down the DEBIX, or manually unmount it using the steps in 'Unmounting a storage device' below.

    More information on each Linux command can be gotten through the specific manual page using the man command. e.g., man fstab.

    3.5.3.Unmounting a Storage Device

    When the DEBIX shuts down, the system takes care of unmounting the storage device so that it is safe to unplug it. If you want to manually unmount a device, run command sudo umount /mnt/mydisk, if the error 'target is busy' shows, this means that the storage device was not unmounted. If no error was displayed, you can safely unplug the device.


    3.5.3.1 Dealing with 'target is busy'

    The 'target is busy' message means there are files on the storage device that are in use by a program. To close the files, use the following procedure.

    • Close any program which has open files on the storage device.
    • If you have a terminal open, make sure that you are not in the folder where the storage device is mounted, or in a sub-folder of it.
    • If you are still unable to unmount the storage device, you can use the lsof tool to check which program has files open on the device. If there is no lsof command in your DEBIX, run command sudo apt update and sudo apt install lsof. To use lsof, run command lsof /mnt/mydisk. For more information of lsof, you can refer to the man page of lsof.
  • 3.6.Localizing your DEBIX
    You can set your DEBIX up to match your regional settings.

    3.6.1.Changing the Language

    If you want to select a different language, configure in Settings from the desktop.

    3.6.2.Configuring the Keyboard

    If you want to select a different keyboard, configure in Settings from the desktop.

    3.6.3.Changing the Timezone

    If you want to change the Timezone, you can change it in Settings from the desktop.
  • 3.7.Securing your DEBIX

    If the security of DEBIX is vulnerable, hackers will then be able to use it without your permission. So it’s recommended you ensure the security of DEBIX.

    It depends on your aim of using DEBIX whether you need to set your DEBIX to a higher security level. For example, if you are simply using your DEBIX at home, behind a router with a firewall, then it is already quite secure by default.

    However, if you wish to expose your DEBIX directly to the internet, you need to make some basic security changes.

    Even if there is a firewall, you also need to take care of security seriously. In the following part, we will describe several ways to improve the security of your DEBIX, the following introduced methods may do not cover all aspects. For more security strategies, please refer to other related documents on the internet.

    3.7.1.Change the Default Password

    By default, each DEBIX running DEBIX OS will use the original username and password(debix:debix). So if these settings have not been changed, other users can have root access to the DEBIX and it’s dangerous. So it’s required to change the password. Run command passwd to change the password, it will prompt you to type in your new password and confirm it.

    3.7.2.Improving SSH Security

    It’s a widely-adopted way to use SSH to access a linux machine remotely. When using SSH, it requires to provide username and password to log in, and there are ways to make this more secure. An even more secure method is to use key based authentication.


    3.7.2.1 Improving username/password security

    If you have a complicated password, this sometimes helps to protect your DEBIX.

    The sshd configuration file is /etc/ssh/sshd_config.

    • To allow or deny specific users: Add, edit, or append to the end of the file /etc/ssh/sshd_config the following content AllowUsers alice bob, which contains the usernames you wish to allow to log in(substitute alice bob to your corresponding names).
    • To stop some usernames from logging in, you can add, edit, or append to the end of the file /etc/ssh/sshd_config the following content DenyUsers jane john, which contains the usernames you wish to deny them from logging in(substitute jane john with your corresponding names).
    • Once the modification of /etc/ssh/sshd_config is finished, run command sudo systemctl restart ssh or reboot so the changes take effect.


    3.7.2.2 Using key-based authentication

    Key pairs are two cryptographically secure keys. One is private, and one is public. They can be used to authenticate a client to an SSH server (for the current situation, the SSH server is DEBIX). As shown in the following image, there are two files in the directory .ssh, these two files are the key pairs. The file id_rsa.pub is the public key, the file id_rsa is the private key.

    The client generates two keys, which are cryptographically linked to each other. The private key(id_rsa) should not be revealed, but the public key(id_rsa.pub) can be freely shared.

    The SSH server maintains a copy of the public key, and, when a link is requested, uses this key to send the client a challenge message, which the client will encrypt using the private key. If the server can use the public key to decrypt this message back to the original challenge message, then the identity of the client can be confirmed.

    On the client, run command ssh-keygen to generate a key pair. The keys are stored by default in the .ssh folder in the user’s home directory. The key will be 2048 bits long: it’s relatively difficult to break the encryption on a key of that length, so it is secure.

    Note that you should only execute the command ssh-keygen once, if repeated, it will overwrite any previous generated keys. The things relying on those old keys will need to be updated to the new keys.

    When executing ssh-keygen, you will be prompted to input a passphrase during key generation: this is for extra security. Currently, just leave it blank and press Enter key.


    The public key now needs to be moved on to the server, you can use command scp to do it, e.g. run command scp id_rsa.pub debix@192.168.31.21:/home/debix/.ssh/id_rsa.pub1 (Remember to substitute the file path and IP address with your own), on the server, run command cd /home/debix/.ssh, then run command cat id_rsa.pub1 >> authorized_keys to add the public key to the tail of file authorized_keys.

    Finally, we need to disable password logins, so that all authentication is done by the key pairs. Run command sudo vim /etc/ssh/sshd_config to edit the configure file, the following three items are needed to be set to no, if they have not been set that way:

    ChallengeResponseAuthentication no 
    PasswordAuthentication no 
    UsePAM no 

    Save the file and either restart the ssh system with sudo systemctl restart sshd or reboot to make the modifications take effect, then, only the clients which has put their public_key to the file authorized_keys of DEBIX Sever can access DEBIX server and users can no longer log in DEBIX server through username and password.

    3.7.3.Installing Firewall ufw

    As for Firewalls, iptables is widely used. iptables is installed by default on DEBIX OS, but is not set up. Setting iptables up can be a complicated task, whereas ufw provides a simpler interface than iptables, ufw(Uncomplicated Fire Wall) can be easily installed on DEBIX.

    • Run command sudo apt install ufw to install ufw.

    There are some GUIs available for ufw, we only introduce some basic command line options in this document. It’s needed to use sudo with ufw command.

    • Run command sudo ufw enable to enable the firewall, it will also ensure ufw starts up on boot
    • Run command sudo ufw disable to disable the firewall, and disable start up on boot
    • Run command sudo ufw allow 22 to allow a particular port to have access(we used port 22 here)
    • Run command sudo ufw deny 22 to deny access on a port(again, we have used port 22 as an example):
    • Run command sudo ufw deny 22/tcp to deny tcp service on port 22. You can specify other services on a port.
    • Run command sudo ufw allow ssh to allow ssh service. You can specify the service even if you do not know which port it uses.
    • Run command sudo ufw status to list all current settings for the firewall

    The rules can be quite complicated. For more information, please refer to the man page of ufw. The following are two relatively sophisticated examples.

    • Run command sudo ufw limit ssh/tcp to limit login attempts on ssh port using tcp: this denies connection if an IP address has attempted to connect six or more times in the last 30 seconds.
    • Run command sudo ufw deny from 192.168.31.21 port 30 to deny access to port 30 from IP address 192.168.31.21

    3.7.4.Installing fail2ban

    Fail2ban is written in Python, it is a scanner that examines the log files produced by DEBIX, and checks them for suspicious activity. It catches things like multiple brute-force attempts to log in, and can inform the installed firewall to stop further login attempts from suspicious IP addresses.

    If you are using your DEBIX as some sort of server, for example an ssh or a webserver, your firewall will have deliberate 'holes' in it to let the server traffic through. In these cases, Fail2ban can be useful.

    • Run command sudo apt install fail2ban to install fail2ban

    On installation, Fail2ban creates a folder /etc/fail2ban in which there is a configuration file called jail.conf.

    • Run command sudo cp /etc/fail2ban/jail.conf /etc/fail2ban/jail.local, the file /etc/fail2ban/jail.conf needs to be copied to /etc/fail2ban/jail.local to enable fail2ban. Inside this configuration file are a set of default options, there are also some options for checking the abnormalities of specific services.
    • Add the following section to the /etc/fail2ban/jail.local file. If this part is already there, update this pre-existing section.
    [sshd]
    # To use more aggressive sshd modes set filter parameter "mode" in jail.local:
    # normal (default), ddos, extra or aggressive (combines all).
    # See "tests/files/logs/sshd" or "filter.d/sshd.conf" for usage example and details.
    #mode   = normal
    enabled = true
    port    = ssh
    logpath = %(sshd_log)s
    backend = %(sshd_backend)s
    maxretry = 6
    • Run command sudo apt install rsyslog, because the logpath is defined in /etc/fail2ban/paths-common.conf, it’s /var/log/auth.log, to achieve this file by default on DEBIX, we need to run sudo apt install rsyslog beforehand.

    If you want to permanently ban an IP address after six failed attempts, you can change the maxretry value in the [ssh] section, and set the bantime to a negative number:

    [sshd] 
    # To use more aggressive sshd modes set filter parameter "mode" in jail.local: 
    # normal (default), ddos, extra or aggressive (combines all). 
    # See "tests/files/logs/sshd" or "filter.d/sshd.conf" for usage example and details. 
    #mode = normal 
    enabled = true 
    port = ssh 
    logpath = %(sshd_log)s 
    backend = %(sshd_backend)s 
    maxretry = 6 
    bantime=-1 

    Once we have modified the fail2ban configuration, it’s needed to run command sudo systemctl restart fail2ban to make the change take effect. For more information, you can refer to fail2ban Main Page.

  • 3.8.Configuring Screen Blanking
    You can configure your DEBIX to use a screen saver or to blank the screen.

    3.8.1 On Console

    When running without a graphical desktop, DEBIX OS will blank the screen after 5 minutes without user input, e.g. mouse movement or key presses.

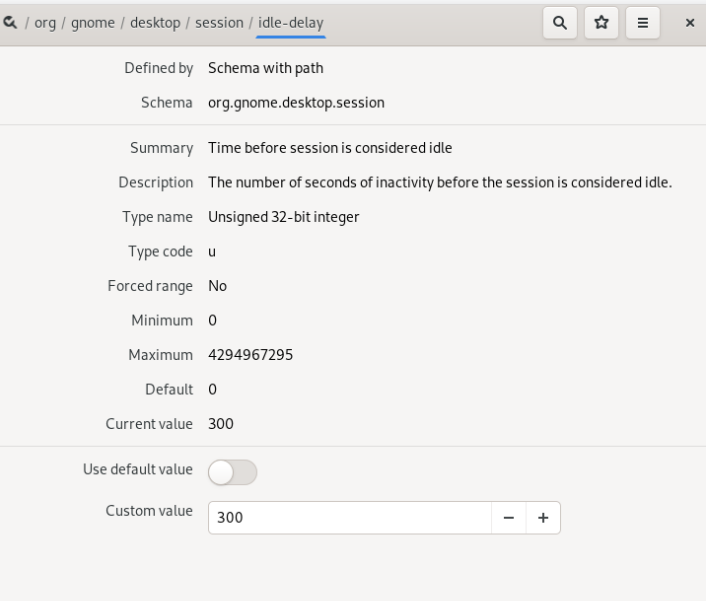
    Run command gsettings set org.gnome.desktop.session idle-delay 60 to set the blank screen time to 1 minute, you can change the time as you want.

    You can also use dconf-editor, to use dconf-editor, you need to install it by running sudo apt install dconf-editor, and then run command dconf-editor to launch the GUI, search idle-delay in the launched GUI, and set the time in custom value.

    3.8.2. Configuring Screen Blanking On the Desktop

    DEBIX OS will blank the graphical desktop after 5 minutes without user input. You can change the blank screen time in power which is a submenu of Settings.

    There is also a graphical screensaver available, which is called xscreensaver.

    • Run command sudo apt install xscreensaver to install xscreensaver. For there are many packages needed to be installed, this command may take a few minutes.

    Once the installation finished, you can find the Screensaver application in Show Applications part on the desktop: it provides many options for setting up the screensaver, including disabling it completely.

  • 3.9. The boot Folder

    In a basic DEBIX OS install, the boot files are stored on the first partition of the Micro SD card, which is formatted with the FAT file system. This means that it can be read on Windows, macOS, and Linux devices.

    When the DEBIX is powered on, it loads various files from the boot partition/folder in order to start up the various processors, then it boots the Linux kernel.

    Once Linux has booted, the boot partition is mounted as /boot.

    3.9.1. Boot Folder Contents


    3.9.1.1.Device Tree files

    There are various Device Tree blob files, which have the extension .dtb. These contain the hardware definitions of the various models of DEBIX, and are used on boot to set up the kernel.

Linux Kernel Introduction
  • 4.1.Kernel

    DEBIX Kernel codes are hosted on GitHub DEBIX Linux, We will update the kernel codes when needed.

    4.1.1. Updating your kernel

    If you use the standard DEBIX OS update process, this will update the kernel to the latest stable version. And this is the recommended procedure.

    4.1.2.Putting your code into the kernel

    There are many reasons you may want to put something into the kernel:


    • You’ve written some DEBIX-specific code that you want everyone to benefit from
    • You’ve written a generic Linux kernel driver for a device and want everyone to use it
    • You’ve fixed a generic kernel bug


    First, you should fork the Linux repository and clone that on your build system; this can be either on DEBIX or on a Linux machine you’re using for cross-compiling. You can then make your changes, test them, and commit them into your fork.

  • 4.2.Building the Kernel

    The compilers and linkers that come with the operating system can generate executable code on this platform. Whereas when one platform generates executable code of another platform, it is defined as cross-compilation.

    Cross-compilation of DEBIX kernel is useful for two reasons:

    • It allows a 64-bit kernel to be built using a 32-bit OS, and vice versa.
    • A powerful enough laptop can cross-compile a DEBIX kernel faster than the DEBIX itself.

    The instructions below are divided into native builds and cross-compilation. Choose the right tool for your situation, although there are many identical steps between the two, it is important to follow them.

    4.2.1.Building the Kernel Locally

    On a DEBIX, first install the latest version of DEBIX OS. Then boot your DEBIX, plug in Ethernet cable to give you access to the sources, and log in.

    Caution

    Kernel compilation has a space requirement, it is recommended to use a 32G micro sd card or above
    First run the following command to install git and the build dependencies:

    sudo apt install git bc bison flex libssl-dev make

    Next get the sources, which will take some time,depending on your ethernet bandwidth:

    git clone --depth=1 https://github.com/debix-tech/linux


    4.2.1.1. Choosing Sources

    The git clone command above will download the current active branch (the one we are building DEBIX OS images from) without any history. Omitting the --depth=1 will download the entire repository, including the full history of all branches, but this takes much longer and occupies much more storage.

    To download a different branch (again with no history), use the --branch option:

    git clone --depth=1 --branch <branch> https://github.com/debix-tech/linux

    In the above command, <branch> is the name of the branch that you wish to download. For ubuntu20.04, <branch> has two branches: debix and SOM_A_IO_BOARD.

    • debix branch supports DEBIX Model A and DEBIX Model B, and run the following command to download the debix branch:
    git clone --depth=1 --branch debix https://github.com/debix-tech/linux
    • SOM_A_IO_BOARD branch supports DEBIX SOM A I/O Board, and run the following command to download the SOM_A_IO_BOARD branch:

    git clone --depth=1 --branch SOM_A_IO_BOARD https://github.com/debix-tech/linux

    For ubuntu22.04, <branch> has two branches: Model_AB-L6.1.22 and SOM_A_BOARD-L6.1.22.

    • Model_AB-L6.1.22 branch supports DEBIX Model A and DEBIX Model B, and run the following command to download the Model_AB-L6.1.22 branch:
    git clone --depth=1 --branch Model_AB-L6.1.22 https://github.com/debix-tech/linux
    
    • SOM_A_BOARD-L6.1.22 branch supports DEBIX SOM A I/O Board, and run the following command to download the SOM_A_BOARD-L6.1.22 branch:

    git clone --depth=1 --branch SOM_A_BOARD-L6.1.22 https://github.com/debix-tech/linux

    Refer to the original GitHub repository for information about the available branches.


    4.2.1.2. Kernel Configuration

    Configure the kernel; as well as the default configuration, you may wish to configure your kernel in more detail or apply patches from another source, to add or remove required functionality.

    Apply the Default Configuration

    First, prepare the default configuration by running the following commands (The default configuration of DEBIX is imx_v8_defconfig):

    cd debix-kernel 
    make imx_v8_defconfig


    4.2.1.3 Building the Kernel

    Build and install the kernel, modules, and Device Tree blobs(this step takes a relatively long time)

    The default device tree is imx8mp-evk.dts, according to the add-on boards used and the show requirement, different device tree can be chosen through Add-on Board tool which is located on the desktop of DEBIX or through running command debix_add_on_board in the command line.

    make -j4 
    sudo make INSTALL_MOD_STRIP=1 modules_install 
    sudo cp arch/arm64/boot/dts/freescale/*.dtb /boot/ 
    sudo cp arch/arm64/boot/Image /boot/

    Await completion and then restart the system.

    4.2.2.Cross-Compiling the Kernel

    First, you will need a suitable Linux cross-compilation host. We tend to use Ubuntu, since DEBIX OS is also a Debian distribution, it means many aspects are similar, such as the command lines. You can also use a virtual machine to install the Linux operating system on Windows to do this.


    4.2.2.1. Install Required Dependencies and Toolchain

    To build the sources for cross-compilation, make sure you have the dependencies needed on your machine by executing:

    sudo apt install git bc bison flex libssl-dev make libc6-dev libncurses5-dev

    And next, install cross compilation tool:

    sudo mkdir /opt/toolchain 
    cd /opt/toolchain 
    sudo wget https://armkeil.blob.core.windows.net/developer/Files/downloads/gnu-a/9.2-2019.12/binrel/gcc-arm-9.2-2019.12-x86_64-aarch64-none-linux-gnu.tar.xz 
    tar xpf gcc-arm-9.2-2019.12-x86_64-aarch64-none-linux-gnu.tar.xz

    Download link to the cross-compilation toolchain generation script for Linux 6.1.22: https://debix-oss.oss-cn-hongkong.aliyuncs.com/imx-desktop-xwayland-glibc-x86_64-armv8a-toolchain-1.0.sh.

    Execute the command to run the script:

    sudo chmod +x imx-desktop-xwayland-glibc-x86_64-armv8a-toolchain-1.0.sh
    sudo ./imx-desktop-xwayland-glibc-x86_64-armv8a-toolchain-1.0.sh

    Note

    You need to execute the following command before doing compilation.
    Then, export environment variables for cross-compilation tool:

    export CROSS_COMPILE=/opt/toolchain/gcc-arm-9.2-2019.12-x86_64-aarch64-none-linux-gnu/bin/aarch64-none-linux-gnu- 
    export ARCH=arm64


    4.2.2.2. Get the Kernel Sources

    To download the minimal source tree for the current branch, run the command:

    git clone --depth=1 --branch <brance> https://github.com/debix-tech/linux
    See choosing sources above for instructions on how to choose a different branch


    4.2.2.3. Build sources

    Enter the following commands to build the sources and Device Tree files.

    • Build with Configs and compile kernel dts modules:

    Note

    To speed up compilation on multiprocessor systems, and get some improvement on single processor ones, use -j n, where n is the number of processors * 1.5. You can use the nproc command to see how many processors you have. Alternatively, feel free to experiment and see what works!

    cd linux-debix	
    make imx_v8_defconfig 
    make -j4 
    make modules
    • Install the compiled kernel module into the out directory, then you can check if the compiled kernel module already exists in the out folder:
    make INSTALL_MOD_STRIP=1 modules_install  INSTALL_MOD_PATH=out	
    cd linux-debix/out/lib/modules/5.10.72
    • You can also check the image, device tree files through these locations.
      • linux-debix/arch/arm64/boot/image
      • linux-debix/arch/arm64/boot/dts/freescale/imx8mp-evk.dtb
      • linux-debix/arch/arm64/boot/dts/freescale/imx8mp-debix-lora-board.dtb
    Optional: If you are simply replacing a compiled kernel module, you can do so by running the following command on DEBIX.

    sudo scp @<Server IP>:/linux-debix/out/lib/modules/5.10.72 /lib/modules 
    

    In the above command, <Server IP> is the IP of computer with a Linux environment where the kernel is compiled.


    4.2.2.4. Install Directly onto the Micro SD Card

    Having built the kernel, you need to copy it onto your DEBIX and install the modules; this is best done directly using a Micro SD card reader. Prepare a Micro SD card with DEBIX OS installed beforehand.

    First, use lsblk before and after plugging in your Micro SD card to identify it. You should end up with something a lot like this:

    sdb 
      sdb1 
      sdb2

    with sdb1 being the FAT (boot) partition, and sdb2 being the ext4 filesystem (root) partition.

    Note
    You should be in the first level of debix-kernel repository directory before executing the following commands,i.e., After you run pwd|grep .*debix-kernel$,you could get output like this: /home/debix/debix-kernel

    Mount these first, adjusting the partition number as necessary:

    mkdir mnt 
    mkdir mnt/fat32 
    mkdir mnt/ext4 
    sudo mount /dev/sdb1 mnt/fat32 
    sudo mount /dev/sdb2 mnt/ext4
    Note

    You should adjust the drive letter appropriately for your setup, e.g. if your SD card appears as /dev/sdc instead of /dev/sdb.

    Next, install the kernel modules onto the SD card:

    export PATH=$PATH:/opt/toolchain/gcc-arm-9.2-2019.12-x86_64-aarch64-none-linux-gnu/bin 
    sudo env PATH=$PATH make ARCH=arm64 CROSS_COMPILE=aarch64-none-linux-gnu- INSTALL_MOD_PATH=mnt/ext4 INSTALL_MOD_STRIP=1 modules_install 
    sudo umount /mnt/ext4

    Finally, copy the kernel and Device Tree blobs onto the SD card, making sure to back up your old kernel:

    sudo cp mnt/fat32/Image mnt/fat32/Image-backup.img 
    sudo cp arch/arm64/boot/Image mnt/fat32/Image 
    sudo cp arch/arm64/boot/dts/freescale/*.dtb mnt/fat32 
    sudo umount /mnt/fat32

    Finally, insert the Micro SD card into DEBIX and start it!


    4.2.2.5. Install to eMMC

    Note

    This method is only advisable for DEBIX Model A with eMMC storage

    First install the produced kernel into the Micro SD card.

    Insert the Micro SD Card into DEBIX, switch the DIP switch to 10, and start DEBIX through eMMC:

    Use the following commands to copy the kernel and device tree files in the Micro SD card to the boot partition of eMMC

    mkdir mnt 
    mkdir mnt/fat32 
    mkdir mnt/ext4 
    sudo mount /dev/sda1 mnt/fat32 
    sudo mount /dev/mmcblk2p1 /boot 
    cp mnt/fat32/* /boot/ 
    sudo umount /dev/sda1

    Take the .ko driver file in the Micro SD card to replace into the eMMC

    mkdir mnt /dev/sda2 mnt/ext4 
    sudo mv /lib/modules/5.10.72 /lib/modules/5.10.72-bak 
    sudo cp -ar mnt/ext4/lib/modules/5.10.72 /lib/modules/ 
    sudo umount mnt/ext4

  • 4.3.Configuring the Kernel

    The Linux kernel is highly configurable, you may want to modify the default configuration to customize it to your needs, such as enabling a new or experimental network protocol, or enabling support for new hardware. Configuration is most commonly done through the make menuconfig interface. Alternatively, you can modify your .config file manually, but this can be more difficult for new users.

    4.3.1.Preparing to Configure

    The menuconfig tool requires the ncurses development headers to compile properly. These can be installed with the following command:

    sudo apt install libncurses5-dev

    You’ll also need to download and prepare your kernel sources, as described in the build guide. In particular, ensure you have installed the default configuration.

    4.3.2.Using menuconfig

    Once you’ve got everything set up and ready to go, you can compile and run the menuconfig utility as follows:

    make menuconfig

    Or, if you are cross-compiling a 64-bit kernel:

    export PATH=$PATH:/opt/toolchain/gcc-arm-9.2-2019.12-x86_64-aarch64-none-linux-gnu/bin 
    make ARCH=arm64 CROSS_COMPILE=aarch64-none-linux-gnu- menuconfig

    The menuconfig utility has simple keyboard navigation. After a brief compilation, you’ll be presented with a list of submenus containing all the options you can configure, there’s a lot, so take your time to read through them and get acquainted.

    Use the arrow keys to navigate, the Enter key to enter a submenu ( ---> instruction). Escape twice to go up a level or exit, and the space bar to cycle the state of an option. Some options have multiple choices, in which case they’ll appear as a submenu and the Enter key will select an option. You can press h on most entries to get help about that particular option or menu.

    Resist the temptation to enable or disable a lot of things on your first attempt; it’s relatively easy to break your configuration, so start small and get comfortable with the configuration and build process.

    4.3.3.Saving your Changes

    Once you’ve made the changes you want, press Escape until you’re prompted to save your new configuration. By default, this will save to the .config file. You can save and load configurations by copying this file around.
Using Linux
  • 5.1. Terminal Introduction
    Terminal provides the input and output environment for your system. It is used as the interface of human-computer interaction. Terminal allows users deeply accessing the system. In the terminal, users can effectively handle complex tasks through programs which take various commands together. However terminal itself does not have computing processing power.

    5.1.1. Terminal Window

    In DEBIX, the default terminal application is called gnome-terminal. You can open a terminal through the application on the DEBIX desktop or the shortcut Ctrl+Alt+T, and when started will look something like this:

    In the terminal window you will be able to see the following prompt ,it contains some system information.

    debix@imx8mpevk~ $

    In the above image, you can find the username and the hostname of the DEBIX. Here debix is your username and imx8mpevk is your hostname.

    5.1.2. Start Enjoying Your DEBIX

    Type in your first command ls -la, press Enter to execute the command, and you can view all files / folders and properties in the current directory. The details are shown in the following figure:

    The ls command lists the contents of the directory that you are currently in (your present working directory). If you want to know more about ls command, you can refer to section 5.3.1. The total block size of the file in the current directory, file permissions, modification time and other information are given.

    You can use the cd command to change the working directory, you can choose to give a relative path or an absolute path. The detailed usage is described in section 5.3.1. You can use cd or cd ~ when you want to switch to the default working directory.

    5.1.3. About sudo

    When you need to execute some commands to permanently modify the system state, you will be required to run with root privileges. The sudo command can provide your temporary account with the ability to run this command on the premise that your username is in the user list ('sudoers'). You can prefix your command with sudo , so that your command will run with root privileges.

    For more information about sudo, you can refer to the linux root page.

    Note

    sometimes commands running with root privileges will damage your system. Some systems will remind you to enter the password when using sudo to run the command.

    5.1.4. Auto-complete and history

    Terminal supports viewing historical commands through the up or down keys of the keyboard. When you enter some commands, files or file paths, you can enter a part, and then use the Tab key to complete it automatically. For example, when you want to type in command mkdir, you only need to type in mk and then enter tab key, you can choose mkdir from the listed items.

    5.1.5. Using apt to manage packages

    • Run command sudo apt update to update the list of packages available on DEBIX.
    • Run command sudo apt install <package name> to install a package.
    • Run command sudo apt remove <package name>  to uninstall or remove a package.

    5.1.6. Command manual

    To learn more about a specific command, you can prefix your command with man (e.g. man cd). The man-page of the command will be displayed, including information about the program flag and its impact. Some man pages will give examples of usage. (For ubuntu used by DEBIX, we need to run sudo unnimize to get the man page).

    5.1.7. Other Commonly-used Commands

    Here are some commonly-used commands:

    • cat lists the contents of files, e.g. cat test.py will display the contents of test.py.
    debix@imx8mpevk:~$ cat test.py
    #!/usr/bin/python
    print("Hello world")
    • mkdir: This makes a new directory, e.g. mkdir temp_dir would create the directory temp_dir in the present working directory.
    debix@imx8mpevk:~/tmp-lihong$ mkdir temp_dir
    debix@imx8mpevk:~/tmp-lihong$ ls
    temp_dir
    • cp makes a copy of a file and places it at the specified location, for example: cp test.txt /tmp/nancy/ would copy the file test.txt from your current working directory to the directory /tmp/nancy/ (assuming you have permission to copy it there). Note that if the target is a folder, the filename will remain the same, but if the target is a filename, it will give the file the new name.
    debix@imx8mpevk:~/tmp-lihong$ cp test.txt /tmp/nancy/
    debix@imx8mpevk:~/tmp-lihong$ ls /tmp/nancy/
    test.txt
    • mv moves a file and places it at the specified location (so where cp performs a 'copy-paste', mv performs a 'cut-paste'). The usage is similar to cp, so mv tmp_file /tmp/nancy/ would move the file tmp_file from your home directory to that of the specified user. mv is also used to rename a file, i.e. move it to a new location, e.g. mv test1.txt test2.txt.
    debix@imx8mpevk:~/tmp-lihong$ ls
    test.txt  test1.txt
    debix@imx8mpevk:~/tmp-lihong$ ls /tmp/nancy/
    debix@imx8mpevk:~/tmp-lihong$ mv test.txt /tmp/nancy/
    debix@imx8mpevk:~/tmp-lihong$ ls /tmp/nancy/
    test.txt
    debix@imx8mpevk:~/tmp-lihong$ ls
    test1.txt
    debix@imx8mpevk:~/tmp-lihong$ mv test1.txt test2.txt
    debix@imx8mpevk:~/tmp-lihong$ ls
    test2.txt
    debix@imx8mpevk:~/tmp-lihong$
    • rm removes the specified file (or directory when used with -r). 

    Warning

    Files deteted in this way are generally not restorable.

    debix@imx8mpevk:~/tmp-lihong$ ls 
    test.txt test_dir 
    debix@imx8mpevk:~/tmp-lihong$ rm test.txt 
    debix@imx8mpevk:~/tmp-lihong$ ls 
    test_dir 
    debix@imx8mpevk:~/tmp-lihong$ rm -r test_dir/ 
    debix@imx8mpevk:~/tmp-lihong$ ls 
    debix@imx8mpevk:~/tmp-lihong$

    Other commonly-used commands can be found in the section 5.3.

  • 5.2. The Linux File System
    File system is very important for Linux system. You need to have a basic understanding of it. Your files are kept in file system, your software is installed in file system and so on and so forth. For more information, please refer to the Linux Filesystem Hierarchy Standard.

    5.2.1. Home

    If you are using user debix to login to DEBIX system, you will be located in the home folder of user debix(that is the directory /home/debix) when you open a terminal.

    When you are not working in your home directory, you can navigate to your home folder on the command line, simply type cd and press Enter. This is the equivalent of typing cd /home/debix(assuming your current username is debix), where debix is your username. You can also use the tilde key (~), for example cd ~, which can be used to relatively link back to your home folder. For instance, cd ~/Pictures/ is the same as cd /home/debix/Pictures.

    Run command cd /home to navigate to /home/ and run ls, and you’ll see the home folders of each of the users on the system.

    Note

    If logged in as the root user, typing cd or cd ~ will take you to the root user’s home directory; unlike normal users, this is located at /root/ not /home/root/).

  • 5.3. Linux Commands
    To learn more about some basic and common linux commands and their usage, please check this chapter carefully.

    5.3.1 Filesystem

    mkdir

    The mkdir command can create a new folder, e.g. mkdir temp would create the directory temp in the present working directory.

    Example command output as below:

    debix@imx8mpevk:~$ mkdir temp 
    debix@imx8mpevk:~$ ls 
    Desktop Documents Linux Pictures Templates gstshark_2022-04-21_12:54:49 
    Device Downloads Music Public Videos temp

    cd

    The cd command can change the current directory to the one specified. You can use relative (i.e. cd temp) or absolute (i.e. cd /home/debix/temp) paths.

    Example command output is as below:

    debix@imx8mpevk:~$ cd temp/ 
    debix@imx8mpevk:~/temp$

    ls

    The ls command lists the content of the current directory (or one that is specified). It can be used with the -l flag to display additional information (permissions, owner, group, size, date and timestamp of last edit) about each file and directory in a list format. The -a flag allows you to view files beginning with . (i.e. dotfiles).

    Example command output is as below:

    debix@imx8mpevk:~$ ls 
    Desktop Documents Linux Pictures Templates gstshark_2022-04-21_12:54:49 
    Device Downloads Music Public Videos temp

    rm

    The rm command removes the specified file (or recursively from a directory when used with -r). 

    Cautions

    Be careful with this command: files deleted in this way are mostly gone.

    Example command output is as below:

    debix@imx8mpevk:~/temp$ rm -f temp.txt 
    debix@imx8mpevk:~/temp$ cd .. 
    debix@imx8mpevk:~$ rm -rf temp 
    debix@imx8mpevk:~$ ls 
    Desktop Device Documents Downloads Linux Music Pictures Public Templates Videos gstshark_2022-04-21_12:54:49

    pwd

    The pwd command displays the name of the present working directory: on a DEBIX, entering pwd will output something like /home/debix.

    Example command output is as below:

    debix@imx8mpevk:~$ pwd 
    /home/debix

    rmdir

    The rmdir command removes empty directories.

    Example command output is as below, directory tmp_dir1 is empty, it can be removed by rmdir, directory tmp_dir2 is not empty, it cannot be removed by rmdir:

    debix@imx8mpevk:~/mytemp$ ls 
    debix.txt main.py tmp_dir1 tmp_dir2 
    debix@imx8mpevk:~/mytemp$ ls tmp_dir1 
    tmp_file1 
    debix@imx8mpevk:~/mytemp$ ls tmp_dir2 
    debix@imx8mpevk:~/mytemp$ rmdir tmp_dir1 
    rmdir: failed to remove 'tmp_dir1': Directory not empty 
    debix@imx8mpevk:~/mytemp$ rmdir tmp_dir2 
    debix@imx8mpevk:~/mytemp$ ls 
    debix.txt main.py tmp_dir1 
    debix@imx8mpevk:~/mytemp$

    cp

    The cp command makes a copy of a file and places it at the specified location (this is similar to copying and pasting). For example, cp ~/file1 /home/otheruser/ would copy the file file1 from your home directory to that of the user otheruser (assuming you have permission to copy it there). This command can be used as below:

    • cp FILE FILE (cp file1 file2), copy file1 to file2.
    • cp FILE DIR (cp file1 /temp/) ,it copies file1 to the directory /temp/.
    • cp -r DIR DIR (cp -r dir1 dir2), it recursively copies contents of dir1 to dir2.

    Example command output as below:

    debix@imx8mpevk:~$ ls 
    Desktop Device Documents Downloads Linux Music Pictures Public Templates Videos file1 gstshark_2022-04-21_12:54:49 
    debix@imx8mpevk:~$ sudo cp ~/file1 /home/otheruser/ 
    debix@imx8mpevk:~$ cd /home/otheruser/ 
    debix@imx8mpevk:/home/otheruser$ ls 
    file1

    mv

    The mv command moves a file and places it at the specified location (so where cp performs a 'copy-paste', mv performs a 'cut-paste'). The usage is similar to cp. So mv ~/file1 /home/otheruser/ would move the file file1 from your home directory to that of the user otheruser(assuming you have the permission). This command can be used as below:

    • mv FILE FILE (mv file1 file2), move file1 to file2.
    • mv FILE DIR (mv file1 temp_dir1/), move file1 from the current location to directory temp_dir1/.
    • mv DIR DIR (mv temp_dir1/  temp_dir2/), move directory temp_dir1 to directory temp_dir2.

    Example command output is as below:

    debix@imx8mpevk:~$ ls ~ 
    Desktop Downloads Pictures Templates file1 
    Documents Music Public Videos gstshark_2022-07-13_09:11:19 
    debix@imx8mpevk:~$ sudo mv file1 /home/otheruser/ 
    debix@imx8mpevk:~$ ls 
    Desktop Downloads Pictures Templates gstshark_2022-07-13_09:11:19 
    Documents Music Public Videos 
    debix@imx8mpevk:~$ ls /home/otheruser 
    file1 
    debix@imx8mpevk:~$

    cat

    The cat command lists the contents of file(s), e.g. cat file1 will display the contents of file1. This command can also be used to list the contents of multiple files, i.e. cat *.txt will list the contents of all .txt files in the current directory.

    Example command output is as below:

    debix@imx8mpevk:~$ ls 
    Desktop Device Documents Downloads Linux Music Pictures Public Templates Videos file1 gstshark_2022-04-21_12:54:49 
    debix@imx8mpevk:~$ cat file1 
    This is a test!

    head

    The head command displays the beginning of a file. Can be used with -n to specify the number of lines to show (by default ten), or with -c to specify the number of bytes.

    Example command output is as below:

    debix@imx8mpevk:~$ head -n 1 file1 
    This is a test!

    chmod

    The chmod command can change the permissions for a file. The chmod command can use symbols u (user that owns the file), g (the files group), and o (other users) and the permissions r (read), w (write), and x (execute). Using chmod u+x filename will add execute permission for the owner of the file.

    Example command output is as below:

    debix@imx8mpevk:~$ ls -l test.sh 
    -rw-rw-r-- 1 debix debix 32 Jul 22 02:35 test.sh 
    debix@imx8mpevk:~$ chmod +x test.sh 
    debix@imx8mpevk:~$ ls -l test.sh 
    -rwxrwxr-x 1 debix debix 32 Jul 22 02:35 test.sh 
    debix@imx8mpevk:~$

    ssh

    ssh connects to another computer using an encrypted network connection. For more information, you can check SSH (secure shell)

    Example command output is as below:

    debix@imx8mpevk:~$ sudo ssh debix@192.168.1.10 
    ECDSA key fingerprint is SHA256:4wru1tGenheRduefLj00n6J+dqLJORbylnmWsAwxVmc. 
    Are you sure you want to continue connecting (yes/no/[fingerprint])? yes 
    Warning: Permanently added '192.168.1.10' (ECDSA) to the list of known hosts. 
    debix@192.168.1.10's password: 
    Welcome to Ubuntu 20.04.4 LTS (GNU/Linux 5.10.72-lts-5.10.y+g3f536c684411 aarch64) 
    * Documentation: https://help.ubuntu.com 
    * Management: https://landscape.canonical.com 
    * Support: https://ubuntu.com/advantage 
    This system has been minimized by removing packages and content that are 
    not required on a system that users do not log into. 
    To restore this content, you can run the 'unminimize' command. 
    Last login: Wed Jul 20 08:50:43 2022 from 192.168.1.8 
    debix@imx8mpevk:~$

    scp

    The scp command copies a file from one computer to another using ssh. For more details see SCP (secure copy)

    Example command output is as below:

    debix@imx8mpevk:~/Documents$sudo scp debix@192.168.1.10: ~/file1 /home/debix/Documents/ 
    [sudo] password for debix: 
    debix@192.168.1.10's password:
    file1                                           
    100%   16    33.1KB/s   00:00                                                                                                                                                                    
    debix@imx8mpevk:~/Documents$ ls 
    file1

    dd

    The dd command copies a file converting the file as specified. It is often used to copy an entire disk to a single file or back again. So, for example, dd if=/dev/sdd of=backup.img will create a backup image from an SD card or USB disk drive at /dev/sdd. Make sure to use the correct drive when copying an image to the SD card as it can overwrite the entire disk.

    df

    The df command can display the disk space available and used on the mounted filesystems. Use df -h to see the output in a human-readable format using M for MBs rather than showing number of bytes.

    Example command output is as below:

    debix@imx8mpevk:~$ df -h 
    Filesystem Size Used Avail Use% Mounted on 
    /dev/root 29G 5.6G 22G 21% / 
    devtmpfs 494M 0 494M 0% /dev 
    tmpfs 975M 0 975M 0% /dev/shm 
    tmpfs 195M 3.4M 192M 2% /run 
    tmpfs 5.0M 4.0K 5.0M 1% /run/lock 
    tmpfs 975M 0 975M 0% /sys/fs/cgroup 
    tmpfs 195M 1.3M 194M 1% /run/user/1000 
    tmpfs 195M 36K 195M 1% /run/user/114

    tar

    The tar command stores or extracts files from a tape archive file. It can also reduce the space required by compressing the file similar to a zip file.

    Example command output is as below:

    debix@imx8mpevk:~$ tar -cvf test.tar test.sh 
    test.sh 
    debix@imx8mpevk:~$ ls 
    Desktop Device Documents Downloads Linux Music Pictures Public Templates Videos backup.img file1 gstshark_2022-04-21_12:54:49 test.sh test.tar

    When creating a compressed file, use command tar -cvzf filename.tar.gz directory/. To extract the contents of a file, use command tar -xvzf filename.tar.gz

    unzip

    The unzip command extracts the files from a compressed zip file.

    pipes

    The pipe symbol is a vertical line |. A pipe allows the output from one command to be used as the input for another command. For example, run command cat tmp.txt | grep "hello", the output of command cat tmp.txt will be provided as input for command grep -o "hello". Example command output is as below:

    debix@imx8mpevk:~$ ls 
    Desktop Downloads Pictures Templates gstshark_2022-07-13_09:11:19 
    Documents Music Public Videos tmp.txt 
    debix@imx8mpevk:~$ cat tmp.txt 
    helloworld. 
    debix@imx8mpevk:~$ cat tmp.txt | grep -o "hello" 
    hello 
    debix@imx8mpevk:~$

    &

    Run a command in the background with &, freeing up the shell for future commands.

    tree

    Use the tree command to show a directory and all subdirectories and files indented as a tree structure. You can install it with APT:

    sudo apt install tree

    curl

    Use curl to download or upload a file to/from a server. By default, it will output the file contents of the file to the screen. You can install it with apt:

    sudo apt install curl

    wget

    Download a file from the web directly to the computer with wget

    wget https://www.debix.io/public/uploads/files/20220127/68e3735204a9f7e09114e2ee677a7c9e.pdf command will download the 68e3735204a9f7e09114e2ee677a7c9e.pdf datasheet and save it as 68e3735204a9f7e09114e2ee677a7c9e.pdf.

    man

    Show the manual page for a file with man. To find out more, run man man to view the manual page of the man command. Right now, on DEBIX, you need to run the following command to get manpages:

    sudo unminimize

    5.3.2. Search

    find

    The find command searches a directory and subdirectories for files matching certain patterns.

    Example command output is as below:
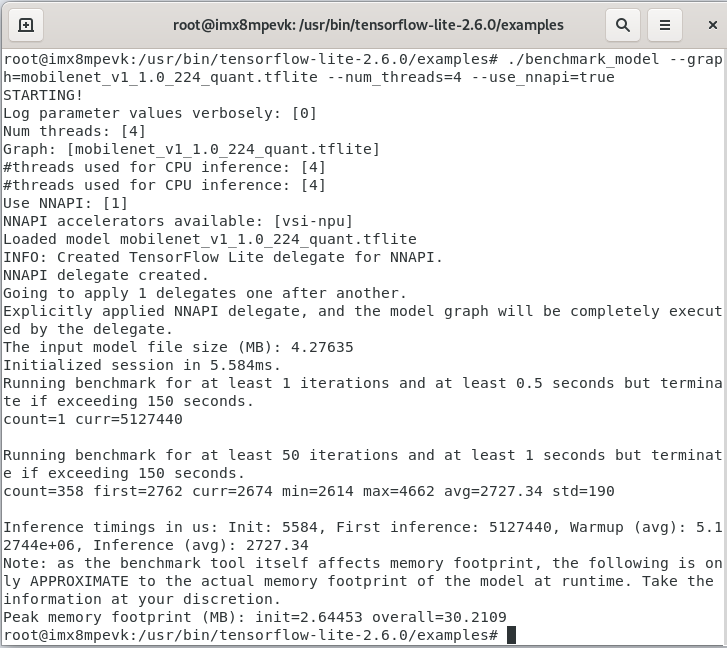
    debix@imx8mpevk:~$ ls 
    Desktop Device Documents Downloads Linux Music Pictures Public Templates Videos backup.img file1 gstshark_2022-04-21_12:54:49 test.sh test.tar 
    debix@imx8mpevk:~$ find . -name "test.sh" 
    ./test.sh

    grep

    Use grep to search inside files for certain search patterns. For example, grep "hello" file* will look in all the files in the current directory starting with file for the string hello. The grep command supports regular expressions which allows special letter combinations to be included in the search. There are various options can be used with command grep, you can refer to its man page.

    Example command output is as below:
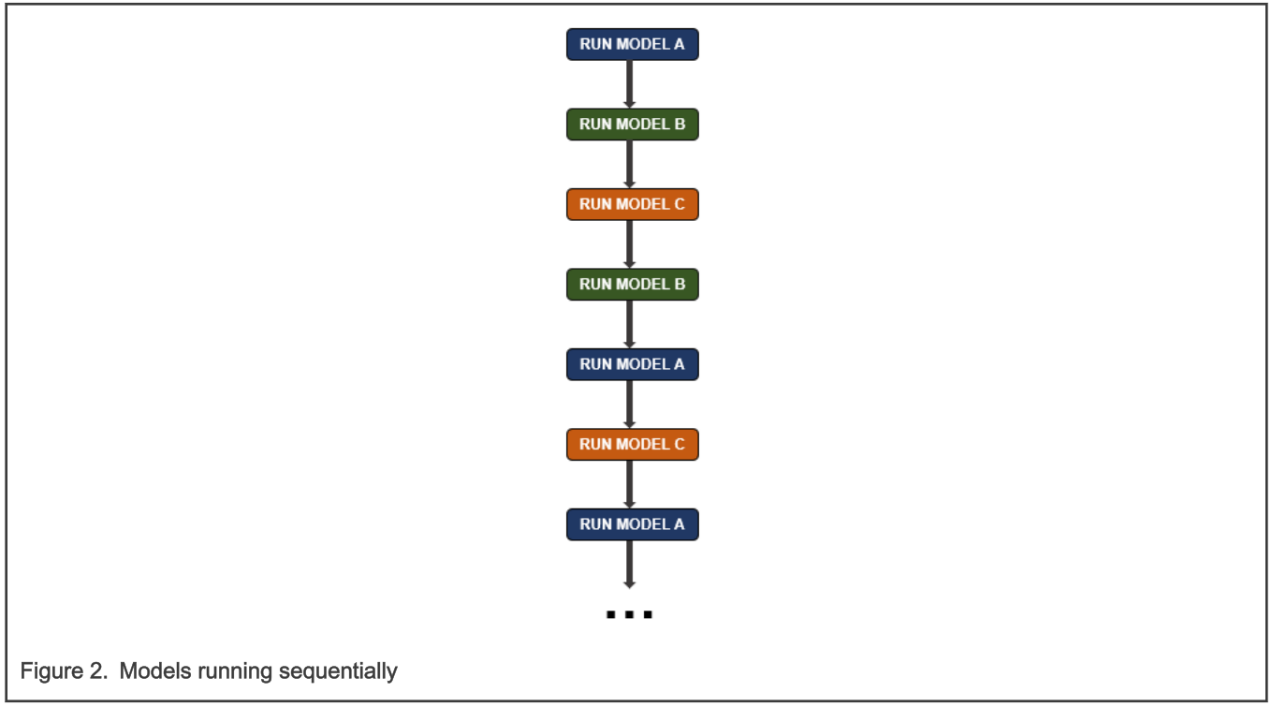
    debix@imx8mpevk:~$ ls 
    Desktop Downloads Pictures Templates gstshark_2022-07-13_09:11:19 
    Documents Music Public Videos tmp.txt 
    debix@imx8mpevk:~$ cat tmp.txt 
    helloworld 
    debix@imx8mpevk:~$ grep -o "h." tmp.txt 
    he 
    debix@imx8mpevk:~$

    awk

    awk is a programming language useful for searching and manipulating text files, it’s useful to get the content of a specific column in a file.

    Example command output is as below:
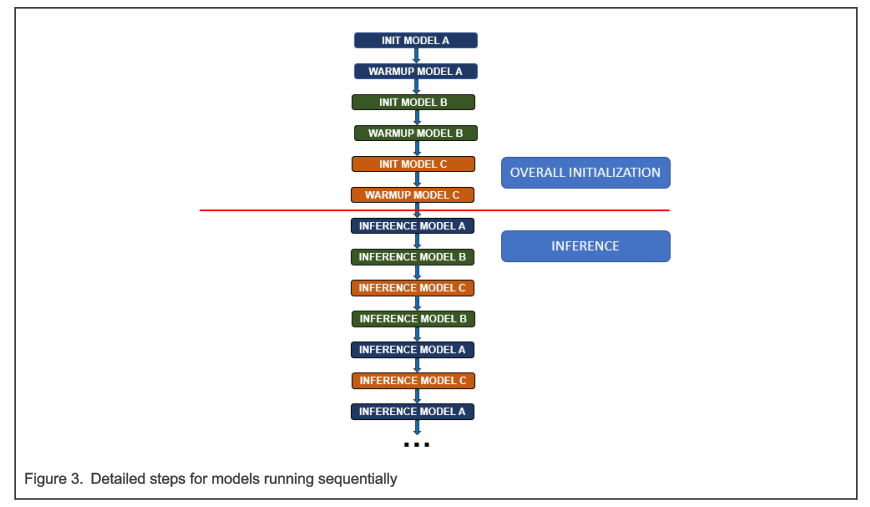
    debix@imx8mpevk:~$ cat tmp.txt 
    color blue 
    name nancy 
    age 11 
    debix@imx8mpevk:~$ awk '{print $1}' tmp.txt 
    color 
    name 
    age 
    debix@imx8mpevk:~$

    whereis

    Use whereis to find the location of a command. It looks through standard program locations until it finds the requested command.

    The command output is as below:
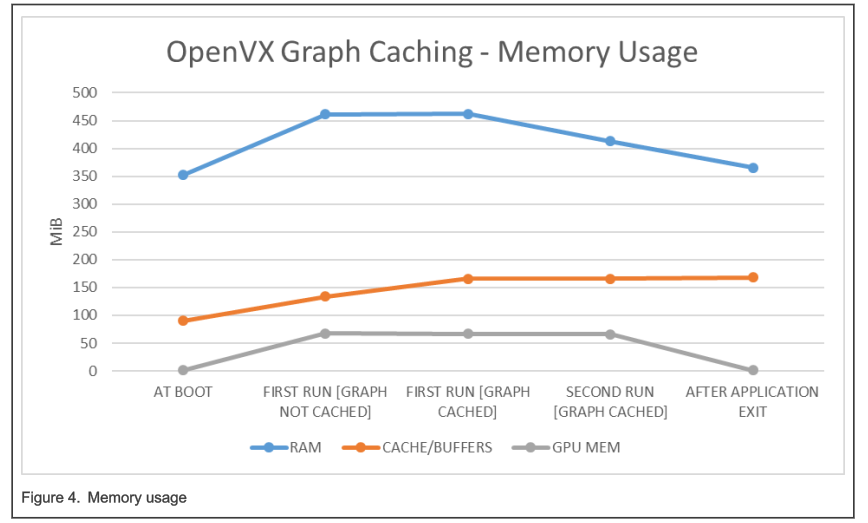
    debix@imx8mpevk:~$ whereis -b whereis 
    whereis: /usr/bin/whereis

    5.3.3. Networking

    ping

    The ping utility is usually used to check if communication can be made with another host. You can provide a hostname (e.g. ping debix.io) or an IP address (e.g. ping 114.114.114.114). It can specify the number of packets to send with the -c flag.

    Example command output is as below:

    debix@imx8mpevk:~$ ping -c 5 debix.io 
    PING debix.io (47.91.220.87) 56(84) bytes of data. 
    64 bytes from 47.91.220.87 (47.91.220.87): icmp_seq=1 ttl=48 time=37.5 ms 
    64 bytes from 47.91.220.87 (47.91.220.87): icmp_seq=2 ttl=48 time=37.6 ms 
    64 bytes from 47.91.220.87 (47.91.220.87): icmp_seq=3 ttl=48 time=37.8 ms 
    64 bytes from 47.91.220.87 (47.91.220.87): icmp_seq=4 ttl=48 time=37.6 ms 
    64 bytes from 47.91.220.87 (47.91.220.87): icmp_seq=5 ttl=48 time=37.7 ms 
    --- debix.io ping statistics --- 
    5 packets transmitted, 5 received, 0% packet loss, time 4007ms 
    rtt min/avg/max/mdev = 37.486/37.643/37.814/0.107 ms

    nmap

    nmap is a network exploration and scanning tool. It can return port and OS information about a host or a range of hosts. You can install it with apt:

    sudo apt install nmap

    ifconfig

    Use ifconfig to display the network configuration details for the interfaces on the current system when run without any arguments (i.e. ifconfig). For more information, you can check the man page.

    hostname

    The hostname command displays the current hostname of the system. A privileged (super) user can set the hostname to a new one by supplying it as an argument (e.g. hostname new-host).

  • 5.4.Text Editors
    You can choose to use many types of text editors on Linux. Simple editors may have limited functions and using complicated editors perhaps requires some training.

    5.4.1. Text Editors in the Terminal


    5.4.1.1 Vi

    Vi command line editor, which is available on most UNIX systems and is installed by default on DEBIX OS. VIM (VI improvement) is inherited from vi, you need to run command sudo apt install vim to install vim.

    Vi and Vim have various different modes, which other editors do not have.

    • Run command vi file.txt, you start in command mode which doesn’t directly permit text entry.
      • Edit the file :Type in i to switch to insert mode in order to edit the file, and edit away.
      • Save the modification:to save the file you must return to command mode, so press the Escape key and enter :w (followed by Enter), which is the command to write the file to disk.
      • To search for the word 'debix' in a file, make sure you’re in command mode (press Escape), then type /debix followed by n and N to flick forwards/backwards through the results.
      • To save and exit, enter the command :wq. To exit without saving, enter the command :q!.


    5.4.1.2 Vim

    Vim is an extension of Vi and works in much the same way, with a number of improvements. If there isn’t a vim in your system, install it with apt:

    sudo apt install vim

    You can edit a file in Vim with vim file.txt.


    5.4.1.3 Emacs

    Emacs is a GNU command-line text editor; it’s powerful and extensible. You can install it with apt:

    sudo apt install emacs
    You can use keyboard combination commands, such as Ctrl + X Ctrl + S to save and Ctrl + X Ctrl + C to close.


    5.4.1.4 nano

    GNU Nano is at the easy-to-use end of command-line editors, use nano file.txt to edit a file, and keyboard shortcuts like Ctrl + O to save and Ctrl + X to exit. You can install it with apt:

    sudo apt install nano
  • 5.5. Users
    User management in DEBIX OS is done on the command line. The default user is debix, and the password is debix. You can add users and change each user’s password.

    5.5.1. Changing Password

    After logging in as a DEBIX user, you can use the passwd command to change the default password to improve the security of DEBIX.

    Enter passwd on the command line and press Enter. You’ll be prompted to enter your current password to authenticate, and then asked for a new password. Press Enter on completion and you’ll be asked to confirm it. Note that no characters will be displayed while entering your password. Once you’ve correctly confirmed your password, you’ll be shown a success message (passwd: password updated successfully), and the new password will apply immediately.


    If your user has sudo permissions, you can change another user’s password with passwd followed by the user’s username. For example, sudo passwd otheruser will allow you to set the user otheruser's password, and then some additional optional values for the user such as their name. Just press Enter to skip each of these options.


    5.5.1.1 Remove a User’s Password

    You can remove the password for the user otheruser with sudo passwd otheruser -d. Without a password the user will not be able to login to a Terminal (This is useful for users that need to exist for system reasons, but you don’t want it to be possible to login to the account for security reasons).

    5.5.2. Adding User

    You can create additional users on your DEBIX OS installation with the adduser command. Enter sudo adduser otheruser and you’ll be prompted for a password for the new user otheruser. Leave this blank if you don’t want a password.


    5.5.2.1 Home Folder

    Once a new user is created, This new created user will have a home folder in /home/. The debix user’s home folder is at /home/debix/.

    5.5.3. Deleting a User

    The userdel command can delete users on the system, and -r can delete their home folders at the same time:

    sudo userdel -r otheruser
  • 5.6. Root and sudo

    Linux operating system allows multi-user login and operation to use it. In order to ensure computer security, the user's operation permission should be restricted.

    Most users are allowed to run most programs, and to save and edit files stored in their own home folder. Normal users are not normally allowed to edit files in other users' folders or any of the system files. There’s a special user in Linux known as the superuser, which is usually given the username root. The superuser can operate and access computers without restrictions.

    5.6.1. Sudo

    When you are not logged in to the computer as root, you can use the sudo command to provide access as a superuser. For example, logging in as debix is an ordinary user. You can use the sudo command to execute the command as root before the command you need to run.

    For example, if you want to install additional software on DEBIX OS then you normally use the apt tool. To update the list of available software, you need to prefix the apt command with sudo: sudo apt update


    You can also use sudo su to run the super user shell. When you run commands as a super user, your system will be very vulnerable to serious damage when you perform some improper operations. It is recommended that you only run commands as a superuser when needed and exit when the superuser shell is no longer needed.

    5.6.2. The sudo’ers List

    The default debix user on DEBIX OS is a member of the sudo group. This gives the ability to run commands as root when preceded by sudo, and to switch to the root user with sudo su.

    • To add a new user to the sudo group, use the adduser command:
    sudo adduser otheruser sudo

    Note

    The user otheruser will be prompted to enter their password when they run sudo. If you wish to remove the password prompt from the new user, create a custom sudoers file and place it in the /etc/sudoers.d directory.

    • Run command sudo visudo /etc/sudoers.d/010_otheruser-nopasswd.
    • Insert the following contents on a single line: otheruser ALL=(ALL) NOPASSWD: ALL
    • Save the file and exit.

    After exiting the editor, if the file does not detect an error, the file is saved and the shell prompt is returned. If errors were detected, you will be asked 'what now?' Press Enter key on your keyboard: this will bring up a list of options. You will probably want to use 'e' for '(e)dit sudoers file again', so you can edit the file and fix the problem

    Note

    Choosing option 'Q' will save the file with any syntax errors still in place, which makes it impossible for any user to use the sudo command.

    Note

    It is standard practice on Linux to have the user prompted for their password when they run sudo, since it makes the system slightly more secure.

  • 5.7. The .bashrc File

    There is a hidden file named .bashrc in your home folder, which contains some user configuration options. You can edit this file according to your needs. Changes made in this file will be actioned the next time a terminal is opened, since that is when the .bashrc file is read.

    If you want your changes to take place in your current terminal, you can

    • Run command source ~/.bashrc (it re-executes the .bashrc file, which may result in undesirable changes to things like the path)
    • Run command exec bash. (it replaces the current shell with a new bash shell, which resets the shell back to the state at login, throwing away any shell variables you may have set)

    For example, some ls aliases:

    alias ls='ls --color=auto' 
    alias grep='grep --color=auto'

    Aliases like these are provided to help users of other systems like Microsoft Windows (dir is the ls of DOS/Windows). Others are to add colour to the output of commands like ls and grep by default.

    5.7.1. The .bash_aliases File

    .bashrc also contains a reference to a .bash_aliases file, which does not exist by default. You can add it to provide a handy way of keeping all your aliases in a separate file.

    if [ -f ~/.bash_aliases ]; then 
        . ~/.bash_aliases 
    fi

    Then you just create the file .bash_aliases and add more aliases like this:

    alias gs='git status'

    You can add other things directly to this file, or to another and include that file like the .bash_aliases example above.

  • 5.8. Shell Scripts

    You can combine commands into one file and then grant executable permission to the file. For example, copy the following into a text editor:

    • Run command touch script-temp to create a script file.
    • Add the following content to this script-temp file.
    #!/bin/bash
    echo "Debix Model A!"
    • Run command chmod +x script-temp to give it executable permission, the file script-temp will now be executable.
    • Run command ./script-temp or command /bin/bash script-temp (assuming it’s in your current directory)

    This script will print Debix Model A!

  • 5.9. Scheduling Tasks with cron

    On UNIX systems, you can use the cron tool to configure scheduled tasks. It is used to schedule commands or scripts to run at the intervals you configured. Using cron, you can back up your files at midnight every day, you can also record specific program information every hour.

    The command crontab (cron table) is used to edit the list of scheduled tasks in operation, and is done on a per-user basis; each user (including root) has their own crontab.

    5.9.1. Editing the crontab File

    • Run command sudo apt install cron to install cron package.
    • Run command crontab -e to edit the cron table.

    Note

    When you run crontab for the first time, you’ll be prompted to select an editor; if you are not sure which one to use, choose nano by pressing Enter.

    5.9.2. Viewing Scheduled Tasks

    • Run command crontab -l to view your currently saved scheduled tasks.

    5.9.3. Adding Scheduled Task

    The layout for a cron entry is made up of six components: minute, hour, day of month, month of year, day of week, and the command to be executed.

    # m h dom mon dow command
    • m: min(0-59)
    • h: hour(0-23)
    • dom: day of month(1-31)
    • mon: month(1-12)
    • dow: day of week(0-7) (0 to 6 are Sunday to Saturday, or use names;7 is Sunday, the same as 0)
    • command: command to execute

    For example:

    0 0 * * * /home/debix/backup.sh

    This cron entry would run the backup.sh script every day at midnight.

    5.9.4. Erase Scheduled Tasks

    • Run command crontab -r to delete all currently scheduled tasks:

    5.9.5. Running a Task on Reboot

    You can substitute @reboot with the time and date to run the command every time the machine starts up. For example:

    @reboot python /home/debix/mytemp.py
    If you want your command to be run in the background while the DEBIX continues starting up, add a space and & at the end of the line, like this:

    @reboot python /home/debix/mytemp.py &

  • 5.10. The systemd Daemon
    Alternatively, you can add it as a service. Then, you can start/stop enable/disable from the linux prompt.

    5.10.1. Creating a Service

    On your DEBIX, create a .service file for your service, for example: myscript.service

    • Run command touch mytemp.service to create a service file, add the following content to it
    [Unit]
    Description=My service
    After=network.target
    [Service]
    ExecStart=/usr/bin/python3 -u main.py
    WorkingDirectory=/home/debix/mytemp
    StandardOutput=inherit
    StandardError=inherit
    Restart=always
    User=debix
    

    So in this instance, the service would run Python 3 from our working directory /home/debix/mytemp which contains our python program to run main.py. But you are not limited to Python programs: simply change the ExecStart line to be the command to start any program or temp that you want running from booting.

    • Run command touch /home/debix/mytemp/main.py to create file main.py in directory /home/debix/mytemp, add the following content to it.
    #!/usr/bin/python3
    import os
    os.system("touch %s" % "debix.txt")
    • Run chmod +x /home/debix/mytemp/main.py to make file main.py executable.
    • Run command sudo cp mytemp.service /etc/systemd/system/mytemp.service to copy this service file into /etc/systemd/system as root.
    • Run command sudo systemctl daemon-reload to inform systemd that a new service has been added.
    • Run command sudo systemctl start mytemp.service to start the service, in this example, after starting the service, you will find a new file debix.txt is created under the working directory /home/debix/mytemp.
    • Run command sudo systemctl stop mytemp.service to stop the service.
    • Run command sudo systemctl enable mytemp.service to start it automatically on reboot.
    The systemctl command can also be used to restart the service or disable it from boot up.
    Note
    The order in which things are started is based on their dependencies — this particular script should start fairly late in the boot process, after a network is available (see the After section). You can configure different dependencies and orders based on your requirements.
Remote Access
  • 6.1.Introduction to Remote Access

    When using DEBIX, if you do not have a monitor or you want to access it from somewhere else, then you need to know remote access. You can connect to your DEBIX from another machine. But you need to know its IP Address beforehand.

    Once a device is connected to a Local Area Network, the device will be assigned an IP address. It’s easy to know your DEBIX’s IP address if your DEBIX has a display, and there are also various other methods of finding DEBIX’s IP address remotely from another machine on the network. If you have gotten DEBIX’s IP address, you can connect to your DEBIX from another machine using tools such as SSH.

    6.1.1.Finding DEBIX's IP address

    • If your DEBIX have a display, run command hostname -I to find the IP address.
    hostname -I

    • If your DEBIX do not have a display, you can try following methods:
      • Using router devices list. In a web browser navigate to your router’s IP address e.g. http://192.168.31.1, which is usually printed on a label on your router; this will take you to a control panel. Then log in using your credentials, you will find your DEBIX’s IP address.
      • Resolving imx8mpevk.local with mDNS. On DEBIX, multicast DNS is supported out-of-the-box by the Avahi service. If your device supports mDNS, you can reach your DEBIX by using its hostname with the .local suffix. The default hostname on a fresh Ubuntu OS install is imx8mpevk, so by default any DEBIX running Ubuntu responds to the following command:
    ping imx8mpevk.local

    If DEBIX is reachable, this will show DEBIX’s IP address like this:


    If you change the system hostname of the DEBIX(e.g., by editing /etc/hostname), Avahi will also change the .local mDNS address.

      • Use nmap command. The nmap command (Network Mapper) is a free and open-source tool for network discovery, available for Linux, macOS, and Windows. To install it on Linux, install the nmap package e.g. apt install nmap. To install nmap on macOS or Windows, see the nmap.org download page.

    To use nmap to scan the devices on your network, you need to know the subnet you are connected to. First find your own IP address, in other words the one of the computer you’re using to find your DEBIX’s IP address (On Linux, type hostname -I into a terminal window; On macOS, go to System Preferences then Network and select your active network connection to view the IP address; On Windows, go to the Control Panel, then under Network and Sharing Center, click View network connections, select your active network connection and click View status of this connection to view the IP address).

    After you have had the IP address of your computer, you will scan the whole subnet for other devices. For example, if your IP address is 192.168.31.97, other devices will be at addresses like 192.168.31.27, 192.168.31.37, 192.168.31.47, etc. The notation of this subnet range is 192.168.31.0/24 (it covers 192.168.31.0 to 192.168.31.255).

    Now use the nmap command with the -sn flag on the whole subnet range. This may take a few seconds:

    nmap -sn 192.168.31.0/24
    For each device that responds to this command, the output are as below:

    Here you can see a device with hostname imx8mpevk has IP address 192.168.31.14

    Note

    To see the hostnames, you must run nmap command with sudo.

  • 6.2.Setting up an SSH Server

    The Secure Shell (SSH) protocol can be used to access the command line of DEBIX remotely from another computer. However, only the command line can be accessed, you can not access the full desktop environment.

    6.2.1.Set up your Local Network

    Connect your DEBIX with peripherals (such as display, power adapter, etc.), if you use wireless networking, network can be configured on the desktop or from the command line. If you use the Ethernet, remember to connect your DEBIX with the router.

    Note

    You need to remember your DEBIX’s IP address in order to connect to it later. To get your DEBIX’s IP address, you can run command ifconfig or command hostname -I in the command line.

    6.2.2.Enabling the Server

    On DEBIX, the SSH server is enabled by default.
  • 6.3.Secure Shell from Linux or Mac OS

    On one DEBIX, one Mac book or a linux computer, run the following command to log in to the DEBIX you want to connect to. Here, you need to give the IP address of the DEBIX you want to connect to. As for how to get the IP address, you can refer to “Finding DEBIX’s IP address” part of this document (run command ifconfig or command hostname -I).

    ssh debix@<IP>

    During the connection, it will prompt you a security/authenticity warning. Type yes to continue. You will only see this warning the first time you connect. If you receive a connection time out error, you need to check the given IP address.

    If no other errors occur, you will be prompted for the password for the debix login (default password is debix), update it if you have changed it to another password (For security reasons, it is recommended to change the default password on DEBIX).

    Once the correct password is provided, you should now be able to see the DEBIX prompt, which will be the same with the one found on the DEBIX itself, you should see something like this:

    debix@imx8mpevk ~ $

    If you have set up another user on the DEBIX, you can connect to it in the same way, replacing the username and IP address with your corresponding one, e.g. nancy@192.168.31.23

    You are now connected to the DEBIX remotely, and can execute commands.

  • 6.4.Secure Shell from Windows 10

    On Windows10, if you want to connect to your DEBIX, open the command window and input the following command, replace <IP> with the IP address of the DEBIX you’re trying to connect to.

    ssh debix@<IP> 

    When the connection works you will see a security/authenticity warning. Type yes to continue. You will only see this warning the first time you connect.

    If the error connection timed out error occurs, you need to check the given IP address.

    If no error occurs, you will be prompted for the password for the debix login (default password is debix), update it if you have changed it to another password (For security reasons, it’s recommended to change the default password on DEBIX).

    Once the password is provided, you should now be able to see the DEBIX prompt, which will be the same with the one found on the DEBIX itself.

    debix@imx8mpevk:~ $ 

    If you have set up another user on the DEBIX, you can connect to it in the same way, replacing the username and IP address with your corresponding ones, e.g. nancy@192.168.31.23

    You are now connected to the DEBIX remotely, and can execute commannds.

  • 6.5.Passwordless SSH Access
    When using SSH to log in to DEBIX, you can use either SSH key or a password.

    6.5.1.Checking for Existing SSH Keys

    First, check whether there are already keys on the computer you are using to connect to the DEBIX:

    ls ~/.ssh

    If you see files named id_rsa.pub or id_dsa then you have keys set up already, so you can skip the 'Generate new SSH keys' step below.

    6.5.2.Generate new SSH Keys

    First, run the following command to generate SSH keys:

    ssh-keygen

    After executing this command, you will be asked where to save the key. It’s recommended to save it in the default location (~/.ssh/id_rsa) by pressing Enter. You will then be asked to enter a passphrase(The passphrase is used to encrypt the private SSH key, so that if someone else copied the key, they could not impersonate you to gain access). If you want to use a passphrase, type it here and press Enter, then type it again when prompted. Leave the field empty for no passphrase.

    Then, your .ssh directory should look like this:

    debix@imx8mpevk:~$ ls .ssh 
    id_rsa id_rsa.pub

    As shown in the above image, there are two files named id_rsa and id_rsa.pub

    • The id_rsa file is your private key. Just locate it in your computer. 
    • The id_rsa.pub file is your public key. This is used to share with computers that you connect to: in this case your DEBIX. When the computer you try to connect to matches up your public and private key, it will allow you to connect.

    6.5.3.Copy your Key to your DEBIX

    On the computer you are using to connect to the remote DEBIX, run the following command to append the public key to your authorized_keys file on the DEBIX by sending it over SSH, substitute the <USERNAME> with the username you used to log in to remote DEBIX, substitute the <IP-ADDRESS> with the IP address of the remote DEBIX.

    ssh-copy-id <USERNAME>@<IP-ADDRESS>

    If command ssh-copy-id is not available on your system, you can copy the file id_rsa.pub manually and then put its content to the corresponding authorized_keys file or you can run the following command:

    cat ~/.ssh/id_rsa.pub | ssh <USERNAME>@<IP-ADDRESS> 'mkdir -p ~/.ssh && cat >> ~/.ssh/authorized_keys'
    If error ssh: connect to host <IP-ADDRESS> port 22: Connection refused shows and the IP-ADDRESS is correct, then you may not have enabled SSH on your DEBIX.

    If you are using windows, download WinSCP to transfer the file ‘id_rsa.pub’ to DEBIX and add the context of file ‘id_rsa.pub’ to file ‘~/.ssh/authorized_keys’. If file ‘~/.ssh/authorized_keys’ does not exist, create directory ~/.ssh and file ~/.ssh/authorized_keys manually, then add the content of file ‘id_rsa.pub’ to ~/.ssh/authorized_keys.

    Then, you can try ssh <USER>@<IP-ADDRESS> and you should connect without a password prompt.

  • 6.6.Using Secure Copy

    The command Secure Copy (scp) send files over SSH. This means you can copy files between computers, say from your DEBIX to your desktop or laptop, or vice-versa. You’ll need to know your DEBIX’s IP address beforehand.

    6.6.1.Copying Files to your DEBIX

    Run the following command to copy the file myfile.txt from your computer to the debix user’s home folder of your DEBIX at the IP address 192.168.31.23:

    scp myfile.txt debix@192.168.31.23:

    Run the following command to copy the file myfile.txt to the /home/debix/project/ directory on your DEBIX (the project folder must already exist):

    scp myfile.txt debix@192.168.31.23:project/

    6.6.2.Copying Files from your DEBIX

    Run the following command to copy the file myfile.txt from your DEBIX to the current directory on your other computer:

    scp debix@192.168.31.23:myfile.txt .

    6.6.3.Copying Multiple Files

    Run the following command to copy multiple files by separating them with spaces:

    scp myfile.txt myfile2.txt debix@192.168.31.23:

    Run the following command to copy all the files that has a suffix “.txt” to the remote DEBIX:

    scp *.txt debix@192.168.31.23:

    6.6.4.Copying a Whole Directory

    Run the following command to copy the directory project/ from your computer to the debix user’s home folder of your DEBIX at the IP address 192.168.31.23:

    scp -r project/ debix@192.168.31.23:
  • 6.7.Using rsync

    The tool rsync can be used to synchronize folders between computers. You can use it to transfer some files from your desktop computer or laptop to your DEBIX. Using rsync over SSH allows you to transfer files to your computer automatically.

    The following is an example of how to set up the sync of a folder named my_files on your DEBIX to your computer:

    On your computer, run the following command to create a folder called my_files:

    mkdir my_files

    Look up the DEBIX’s IP address by logging in to it and running hostname -I. In this example, there are several file in the folder /home/debix/my_files, and there will be some new files added to this folder continuously.

    Maybe you will need to install rsync, for example, if you are using Debian, run the following command to install it:

    sudo apt install rsync
    Now run the following command (substituting your own DEBIX’s IP address):
    rsync -avz -e ssh debix@192.168.31.23:my_files/ my_files/
    This command will copy all files from the DEBIX’s my_files folder to your computer’s new my_files folder.
  • 6.8.Network File System (NFS)

    You can use Network File System(NFS) to share a directory located on one networked computer with other computers or devices on the same network. The computer maintains the directory to share is called the server, and computers connecting to that server are called clients.

    Clients usually mount the shared directory to make it a part of their own directory structure. The shared directory is an example of a shared resource or network share.

    To deploy an NFS, you should be familiar with linux file and directory permissions, and you should also be familiar with mounting and unmounting filesystems.

    6.8.1.Setting up a Basic NFS Server

    Run the following command to install the required packages:

    sudo apt install nfs-kernel-server

    In order to configure easily, we will isolate all NFS exports in single directory, and mount the real directories into this single directory with the --bind option.

    The following is an example of exporting our users' home directories, which are in /home/users First we create the export file system:

    sudo mkdir -p /export/users

    Note

    /export and /export/users will need 777 permissions, as we will be accessing the NFS share from the client without LDAP/NIS authentication. This will not apply if using authentication

    Now mount the real users directory with command:

    sudo mount --bind /home/users /export/users
    On every reboot, we need to run the above command again to mount the /home/users directory to /export/users, in order to not run the above command on each reboot, we add the following line to /etc/fstab
    /home/users /export/users none bind 0 0

    There are three configuration files that relate to an NFS server:

    • /etc/default/nfs-kernel-server (The only important option in /etc/default/nfs-kernel-server for now is NEED_SVCGSSD. It is set to "no" by default, which is fine, because we are not activating NFSv4 security this time.)
    • /etc/default/nfs-common
    • /etc/exports

    In order for the ID names to be automatically mapped, the file /etc/idmapd.conf must exist on both the client and the server with the same contents and with the correct domain names. Furthermore, this file should have the following lines in the Mapping section:

    [Mapping] 
    Nobody-User = nobody 
    Nobody-Group = nogroup

    Note

    The client may have different requirements for the Nobody-User and Nobody-Group. For example, on RedHat variants, it is nfsnobody for both. If you’re not sure, check via the following commands to see if nobody and nogroup are there:

    cat /etc/passwd 
    cat /etc/group
    This way, server and client do not need the users to share same UID/GUID. For those who use LDAP-based authentication, add the following lines to the idmapd.conf of your clients:
    [Translation] 
    Method = nsswitch

    This will cause idmapd to know to look at nsswitch.conf to determine where it should look for credential information. 

    To export our directories to a local network 192.168.31.0/24, we add the following two lines to /etc/exports:

    /export 192.168.31.0/24(rw,fsid=0,insecure,no_subtree_check,async) 
    /export/users 192.168.31.0/24(rw,nohide,insecure,no_subtree_check,async)

    Finally, to make your changes take effect, restart the service:

    sudo systemctl restart nfs-kernel-server

    6.8.2.Configuring an NFS Client

    After the nfs server is running, you need to set up the NFS client to be able to access the server. To start, install the required packages:

    sudo apt install nfs-common

    On the client, we can mount the complete export tree with one command:

    sudo mount -t nfs -o proto=tcp,port=2049 <nfs-server-IP>:/ /mnt

    As for the above command, if you are sure that your server’s hostname can be resolved to an IP on the client side, you can use the NFS server hostname instead of its IP address. A robust way of ensuring that this will always resolve is to use the /etc/hosts file, you can add the corresponding line (e.g.  192.168.31.209 ubuntu) to the file /etc/hosts on the client.

    Note

    <nfs-server-IP>:/export is not necessary in NFSv4, as it was in NFSv3. The root export :/ defaults to export with fsid=0.

    To ensure this is mounted on every reboot, add the following line to /etc/fstab:

    <nfs-server-IP>:/   /mnt   nfs    auto  0  0
    After mounting, if the entry in /proc/mounts appears as <nfs-server-IP>:// (with two slashes), then you might need to specify two slashes in /etc/fstab, or else umount might complain that it cannot find the mount.
  • 6.9.Samba (SMB/CIFS)

    Samba is a free software, and is comprised of server and client. It is an implementation of the SMB/CIFS networking protocol that is used by Microsoft Windows devices to provide shared access to files, printers, and serial ports. On your DEBIX, you can use Samba to mount a folder shared from a Windows machine, and you can also share a folder from your DEBIX to your Windows machine.

    6.9.1.Installing Samba related packages

    By default, DEBIX OS does not include CIFS/Samba support, but this can be added. The following commands will install all the required components for using Samba as a server or a client.

    sudo apt update 
    sudo apt install samba samba-common-bin smbclient cifs-utils

    6.9.2.Mount a Folder Shared from Windows

    It is obvious that you need to share a folder on your Windows device.


    6.9.2.1. Turn on sharing on Windows

    • Right-click the system tray and select network connection
    • Click on network and sharing center, then enter it
    • Click on Change advanced sharing settings
    • Select Turn on network discovery
    • Select Turn on file and printer sharing
    • Save changes


    6.9.2.2. Share the folder

    You can share any folder you want, but for this example, simply create a folder called share.

    • On your desktop, create a folder share.
    • Right-click the new folder, and select Properties.
    • Click on the Sharing tab -> Advanced Sharing button.
    • Select Share this folder; by default, the share name is the name of the folder.
    • Click on the Permissions button.
    • As for this example, select Everyone and Full Control (you can limit access to specific users if required); click OK when done, then OK again to leave the Advanced Sharing page.
    • Click on the Security tab, as we now need to configure the same permissions
    • Select the same settings as the Permissions tab, adding the chosen user if necessary
    • Click OK

    Once the above steps are finished, the folder should now be shared.


    6.9.2.3. Windows 10 Sharing Wizard

    On Windows 10 there is a Sharing Wizard that helps with some of these steps.

    • Open the Computer Management application from the Start Bar.
    • Select Shared Folders, then Shares.
    • Right-click and select New Share, which will start up the Sharing Wizard; click Next.
    • Select the folder you wish to share, and click Next.
    • Type in share name and click Next to use all the sharing defaults.
    • Set the required permissions, and click Finish.


    6.9.2.4. Mount the folder on DEBIX

    • Run the following command to create a directory to be mounted into
    mkdir windowshare
    • Run the following command to mount the remote folder to the created folder. The remote folder is the host name or IP address of the Windows PC, and the share name used when sharing it. The Windows username is also needed to be provided.
    sudo mount.cifs //<hostname or IP address>/share /home/debix/windowshare -o user=<name>

    You should now be able to view the content of the Windows share on your DEBIX.

    cd windowshare 
    ls

    6.9.3.Sharing a Folder from your DEBIX to Windows 10


    6.9.3.1. DEBIX configurations

    Firstly, create the folder to share. This example creates a folder called shared in the home folder of the current user, and assumes the current user is debix.

    cd ~ 
    mkdir shared 
    chmod 0740 shared

    Note

    Sometimes after sharing using samba from debix, on windows10, we cannot operate on the shared directory (it notifies that we do not have permission), we need to run chmod 777 shared (substitute shared to the directory you create in your computer) to operate on it.


    Now we need to tell Samba that there is a debix user when accessing that folder. When asked, enter the password of the debix user (that's the default password), but that is well known and should be changed for better security.

    sudo smbpasswd -a debix
    Now we need to tell Samba to share this folder, using the Samba configuration file.
    sudo vim /etc/samba/smb.conf
    At the end of the file, add the following to share the folder, giving the remote user read/write permissions:
    [share] 
        path = /home/debix/shared 
        read only = no 
        public = yes 
        writable = yes
    In the same file, find the workgroup line, and if necessary, change it to the name of the workgroup of your local Windows network.

    workgroup = <your workgroup name here>

    Right now, On your Window 10, when you browse the network (type \\<your debix ip > in the search bar in the down left corner of your Windows 10 desktop), the folder should appear and you should be able to connect to it.

  • 6.10.Setting up an Apache Web Server

    Apache is a popular web server application you can install on the DEBIX to allow it to serve web pages. On its own, Apache can serve HTML files over HTTP, and with additional modules can serve dynamic web pages using scripting languages such as PHP.

    6.10.1.Installing Apache

    • Run the following command to update all the available packages:
    sudo apt update
    • Run the following command to install the package apache2:
    sudo apt install apache2 -y

    6.10.2.Test the Web Server

    Apache puts a test HTML file in the web folder by default. You can access the default web page when you browse to http://localhost/ on the DEBIX itself, or http://192.168.31.23 (substitute the IP with your DEBIX’s IP address) from another computer on the network. To find the DEBIX’s IP address, run command hostname -I or command ifconfig in the command line, and there are also some other approaches.

    Browse to the default web page either on the DEBIX or from another computer on the network and you should see the following:

    When you see the above image, it means that you have Apache working.


    6.10.2.1. Changing the Default Web Page

    This default web page is just an HTML file on the filesystem. It is located at /var/www/html/index.html.

    Navigate to this directory in a terminal window and have a look at what’s inside:

    cd /var/www/html 
    ls -al
    This will show you:
    total 20 
    drwxr-xr-x 2 root root 4096 Jul 21 09:48 . 
    drwxr-xr-x 3 root root 4096 Jul 21 09:48 .. 
    -rw-r--r-- 1 root root 10918 Jul 21 09:48 index.html

    From the above, we can see that there is one file /var/www/html/ called index.html and it is owned by the user root, the enclosing folder is also owned by the user root. In order to edit the file, you need to change its ownership to your own username. Change the owner of the file using command chown, so here the command should be sudo chown debix:debix index.html.

    Now, you can try to edit this file and then refresh the browser to check the web page change. You can also do some research on HTML to make your own websites.

    6.10.3.Installing PHP for Apache

    Run the following command to install the latest version of PHP and PHP module for Apache, thus your Apache server can process PHP files.

    sudo apt install php libapache2-mod-php -y

    Now remove the file:index.html

    sudo rm index.html
    and create the file :index.php
    sudo vim index.php
    Put some PHP content in it:

    <?php echo "Hello, This is Debix"; ?>
    Now save and refresh your browser. You should see "Hello, This is Debix". This is not dynamic but still served by PHP. 
  • 6.11.Network boot your DEBIX

    This instructions assume that you have an existing home network. A Ubuntu virtual machine is used for the server. You will need a DEBIX client to be booted. The DEBIX should be connected with peripherals and also with an Micro SD card (already flashed an image) inserted.

    • Ubuntu virtual machine server Configuration

    Assuming that the user account you are using is debix, run the following command to install the required packages.

    sudo apt install nfs-kernel-server rpcbind
    Then, run the following command to create a directory
    sudo mkdir -p /home/debix/nfs_new

    Add the following line to file /etc/exports:


    Put the DEBIX kernel image(Image), device tree file(imx8mp-evk.dtb), and the decompressed root filesystem under directory /home/debix/nfs_new


    run the following command under directory /home/debix/nfs_new:
    sudo chown -R root:root .

    Run the following command to restart nfs-kernel-server:

    sudo /etc/init.d/nfs-kernel-server restart
    • DEBIX client uboot configuration

    Instantly tap the Enter key after pressing the Reset button on the main board to enter the uboot command line of DEBIX

    Environment variable
    Description
    ipaddr
    IP address of DEBIX, you can also choose not to configure it and use dhcp to get an IP address
    ethaddr
    MAC address of DEBIX, it’s needed to be configured
    gatewayip
    gateway IP
    netmask
    subnet mask
    serverip
    Server IP address. The IP address of virtual machine in this sample
    Run the following command in uboot command line:

    setenv ipaddr 192.168.31.111 
    setenv ethaddr b8:ae:1d:01:00:00 
    setenv gatewayip 192.168.31.1 
    setenv netmask 255.255.255.0 
    setenv serverip 192.168.31.197 
    saveenv

    Run the following command in uboot command line to set bootargs:

    setenv bootargs 'console=ttymxc1,115200 root=/dev/nfs rw nfsroot=192.168.31.197:/home/debix/nfs_new,v3,proto=tcp 
    ip=192.168.31.111:192.168.31.197:192.168.31.1:255.255.255.0::ens33:off'

    Run the following command to in uboot command line to set bootcmd:

    setenv bootcmd 'nfs 40480000 192.168.31.197:/home/debix/nfs_new/Image; nfs 43000000 192.168.31.197:/home/debix/nfs_new/imx8mp-evk.dtb; booti 40480000 - 43000000'

    Run the following command in uboot command line to boot:

    saveenv 
    boot
    Finally, you should be able to log in to the system.
DEBIX Hardware
Compute Module Hardware
DEBIX Processor
  • 9.1. NXP i.MX 8M Plus

    The NXP i.MX 8M Plus is the NXP chip used in DEBIX. NXP i.MX 8M Plus, 4 x ARM Cortex-A53, comes with an integrated neural processing unit (NPU) that delivers up to 2.3 TOPS. Industrial grade CPU runs at 1.6GHz, and commercial grade CPU runs at up to 1.8GHz.

    Other information regarding the processor can be found in the i.MX 8 Series Applications Processors.

  • 9.2. CPU Command

    First, switch to root user.

    sudo su

    • Get CPU frequency

    cat /sys/devices/system/cpu/cpu*/cpufreq/cpuinfo_cur_freq

    • Get CPU temperature

    cat /sys/class/thermal/thermal_zone0/temp 
    cat /sys/class/thermal/thermal_zone1/temp

    Where thermal_zone0 represents cpu-thermal, and thermal_zone1 represents soc-thermal.

DEBIX NPU
  • 10.1.Introduction
    DEBIX Model A is powered by the i.MX 8M Plus processor from NXP which includes an integrated neural processing unit (NPU) delivering up to 2.3 TOPS. The stated purpose of the i.MX 8M Plus focuses on Machine Learning (ML) and vision, advanced multimedia, and industrial IoT with high reliability. It is built to meet the needs of Smart Home, Building, City and Industry 4.0 applications. The contents in this document will provide a dive into NPU vs CPU comparison for a better understanding of the power and potential behind DEBIX.

    10.1.1.eIQ ML Software Development Environment®

    The NXP eIQ machine learning(ML) software development environment enables the use of ML algorithms on NXP EdgeVerse®®™ microcontrollers and microprocessors, including i.MX RT crossover MCUs, and i.MX family application processors. eIQ ML software includes a ML workflow tool called eIQ Toolkit, along with inference engines, neural network compilers and optimized libraries. This software leverages open-source and proprietary technologies and is fully integrated into our MCUXpresso SDK and Yocto development environments, allowing you to develop complete system-level applications with ease. Please review the Machine Learning Support Policies for more information.

    Source: NXP

  • 10.2.Purpose

    When comparing NPU with CPU (quad-core Arm® Cortex®-A53 applications processor running at up to 1.8GHz) performance on the i.MX 8M Plus, the perception is that inference time is much longer on the NPU. This is due to the fact that the ML accelerator spends more time performing overall initialization steps. This initialization phase is known as warmup and is necessary only once at the beginning of the application. After this step inference is executed in a truly accelerated manner as expected for a dedicated NPU. The purpose of this document is to clarify the impact of the warmup time on overall performance.

    This document will touch upon the purpose of warmup time and how it on the overall performance of DEBIX.

  • 10.3.Overview

    10.3.1.Software Environment

    The primary APIs supported by the NPU are OpenVX 1.2. Figure 1 presents the software stack for the two inference engines, eIQ TF Lite and Arm NN, which currently support NPU acceleration for i.MX 8M Plus.


    Source: NXP

    Note:

    NN RT: Common library which connects ovxlib.

    ovxlib: A wrapper around OpenVX driver to interface NN functionality.

    OpenVX driver: Khronos defined for acceleration in computer vision and NN functionality.

    For the purpose of this application note, the following software environment was used:

    Yocto BSP release: i.MX 8M Plus Beta 1 release L5.4.24_2.1.0_MX8MP


    • For details of eIQ support build image for imx-image-full, check i.MX Yocto Project User's Guide (document IMXLXYOCTOUG).
    • This Yocto BSP release includes TF Lite 2.1.0. It supports hardware acceleration using Neural Networks API (NNAPI) Delegates.
    • eIQ TF Lite applications (pre-installed for Yocto images containing eIQ)
    • TF Lite benchmarking application (/usr/bin/tensorflow-lite-2.1.0/examples/benchmark_model)
    • TF Lite image classification example (/usr/bin/tensorflow-lite-2.1.0/examples/label_image). This was used as a starting point and modified to demonstrate Warmup Time impact.


    Note:

    For more details on the benchmark_model and label_image applications, refer to i.MX Linux® User's Guide (document IMXLUG).

    10.3.2.Hardware Overview

    The following table lists the hardware features relevant for the use case described in this application note.

    Feature Description
    CPU 4 x Cortex-A53 1.8GHz
    DDR 16/32-bit LPDDR4/DDR4/DDR3L
    AI/ML NN Accel 2.3 TOPS
    L2 cache 512KB with ECC
    NPU

    SRAM (256KB) available for the neural network engine:


    • Provide Intelligent caching mechanism for kernel and input tensor.
    • Pre-determine the best caching allocation.
    • Guarantee no cache thrashing.
    • Multiple layers of kernel can be stored at the same time.
    • Store intermediate tensors.
    • Intermediate tensors are often broken down into smaller tile to reduce memory footprint.


    For more details, please refer to i.MX 8M PLUS APPLICATIONS PROCESSOR FAMILY (document IMX8MPLUSFS).

    10.3.3.CPU versus NPU Performance

    • Image Classification:

    cd /usr/bin/tensorflow-lite-2.6.0/examples

      • Run on CPU

    ./label_image -m mobilenet_v1_1.0_224_quant.tflite -i grace_hopper.bmp -l labels.txt

    Results:

      • Run on GPU/NPU acceleration

    ./label_image -m mobilenet_v1_1.0_224_quant.tflite -i grace_hopper.bmp -l labels.txt -a 1

    Results:


    After this comparison, we can see the average CPU runtime is 47.3ms while with NPU acceleration, it only needs 2.8ms.

    • Benchmarks:
      • CPU single core

    ./benchmark_model --graph=mobilenet_v1_1.0_224_quant.tflite

    Result:

      • CPU running on 4 cores

    ./benchmark_model --graph=mobilenet_v1_1.0_224_quant.tflite --num_threads=4

    Result:

      • GPU/NPU Acceleration

    ./benchmark_model --graph=mobilenet_v1_1.0_224_quant.tflite --num_threads=4 --use_nnapi=true

    Result:

    Results Comparision:

    Tests CPU CPU multi-core NPU
    Image classification 47.432ms

    2.779ms
    Benchmarks 171873us
    47708us
    2727.34us
  • 10.4.In-depth Breakdown

    10.4.1.Warm up time with multiple models running in sequence

    Let’s assume we created an application that runs inference on multiple models sequentially. We have Model A, Model B and Model C. The inference for each is run one step at a time, not necessarily in the same order.

    Source: NXP

    Assuming inference for all the models is executed from the same application. Each of the models has associated a TF Lite Interpreter instance. The Init and Warmup phases should be executed in the beginning. Then the appropriate TF Lite Interpreter will be used to run inference as needed on the corresponding model. 

    To detail the previous sequence, the steps are shown in Figure 3.

    Source: NXP


    To exemplify the impact on performance, we will run a similar sequence on three TF Lite quantized models:

    The time values are obtained when running on the NPU.

    Table 1. Warmup time

    TF Lite Warmup (ms)
    Inference (ms)
    Mobilenet V1
    7896.6
    3.36
    Mobilenet V2
    8846.58
    3.457
    Inception V3
    42169
    17.359

    Note

    Table 1 lists preliminary results, subject to change.

    The average inference time remains the same no matter in what order the models are run.

    • If the models are loaded and used from the same application, the information will be kept, and warmup time only has an impact in the initialization phase. If the application exits and restarts, it will load the models again and go through the warmup phase.
    • Refer to C++ sample code for the C++ sample implementation.
    • Refer to Python sample code for the python sample implementation.
      • The python TF Lite API currently allows running inference only on the NPU (CPU not supported).
      • With the python API, the Init time is not output separately. Only the warm-up and inference time are shown.
    • The results obtained for the C++ and python applications are similar, there is no noticeable overhead in the python version.

    The implementation is based on TF Lite for the purpose of providing a simplified example. The described behavior is the same when using eIQ Arm NN.

    This application is focused on the i.MX 8M Plus NPU but note that the warmup time is specific to ML accelerators with hardware support for the OpenVX API. The warmup time will be significant also for i.MX8 platforms using the GPU as ML accelerator.

    10.4.2.OVX Graph Caching

    There is a way to improve warmup time for subsequent runs of the application by setting the following environment variables:

    export VIV_VX_CACHE_BINARY_GRAPH_DIR=`pwd`

    export VIV_VX_ENABLE_CACHE_GRAPH_BINARY="1"

    By setting up these variables the result of the OpenVX graph compilation will be stored on disk, as the network binary graph files. For example, the files resulted after caching the models used as example in Warmup time in the case of multiple models running sequentially are:

    The runtime will do a quick hash check on the network and if it matches the *.nb file hash it will load it into the NPU memory directly

    Note:

    The environment variables need to be set persistently, such as, available after reboot. Otherwise, the caching mechanism will be bypassed even if the *.nb files are available

    Table 2 Warmup time

    TF Lite
    Warmup time (ms)
    NO OVX Graph Caching
    OVX Graph Caching ENABLED
    Mobilenet V1
    7896.6
    2192.34
    Mobilenet V2
    8846.58
    1828.95
    Inception V3
    42169
    8800.39

    Note:

    Table 2 lists preliminary results, subject to change.

    The decrease of the warm-up time is explained by the fact that the generated network binary graph requires no further compilation and the instructions will be issued to hardware with minimal preparation.

    The main steps of the graph caching process are:

    1.Load TF Lite file into CPU DDR, done by the TF Lite runtime.
    2.The neural network runtime will build the network using the TF Lite model.
    3.The neural network runtime will compile the network and store the NPU instructions in memory owned by the NPU.
    4.The NPU instructions will be saved on disk in the format of a *.nb file.
    5.Next time the same network is loaded in Step 2.
    6.The neural network runtime will do a quick hash check on the network. If it matches the Hash, it will load the *.nb file into NPU memory directly.
    7.Run inference on the NPU.

    To analyze the impact on memory usage, the size of used CPU RAM, CPU Cache/Buffers and NPU memory was analyzed in different stages. For details, see Hardware overview part in this document. The peak value for memory usage is presented for reference. The same application is described in “Warmup time in the case of multiple models running sequentially" was used.

    1.AT BOOT: Measurement was performed immediately after linux login, without executing anything else.

    2.FIRST RUN [GRAPH NOT CACHED]: The first run of the application right after login.

    3.FIRST RUN [GRAPH CACHED]: Graph caching was enabled. 

    Set VIV_VX_CACHE_BINARY_GRAPH_DIR and VIV_VX_ENABLE_CACHE_GRAPH_BINARY. The variables were set persistently in order to remain set after a reboot. Then the application was run again.

    4.SECOND RUN [GRAPH CACHED]: The second run of the application. The graph was previously cached.

    5.AFTER APPLICATION EXIT

    Figure 4 illustrates the memory usage at each stage.

    Source: NXP

    The memory impact should to be taken into consideration when designing the application, to improve the warm-up time might have a draw-back on overall system performance. The impact should be analyzed for each case in order to decide if it will benefit the overall solution.

    Note:

    CPU RAM and Buffers/Cache usage was measured with the linux command, free -h.

    GPU memory usage was measured with the linux command, gmem_info.

  • 10.5.Conclusion

    When benchmarking an application, it is important to have a good understanding of the data in order to draw correct conclusions.

    • In the case of the i.MX 8M Plus NPU, the warmup time is considerably longer then the inference time. It has an impact only on the initialization phase of an application. The time should be measured separately for warmup and inference.
    • Warmup time will usually affect only the first inference run. However, depending on the ML model type it might be noticeable for the first few inference runs. Some preliminary tests must be done to take a decision on what to consider warmup time.
    • Once the warmup phase is well delimited, the subsequent inference runs can be considered as pure inference and used to compute an average for the inference phase.

    Currently the warmup time can be decreased for subsequent application runs by using a graph caching mechanism. One should measure the impact of this feature on overall system performance, in order to decide is the application will benefit from using this mechanism.

    There is work in progress to improve the initial warm-up time, speeding up the graph initialization without using the caching mechanism, so please check future releases for related updates.